Showing posts with label essence. Show all posts

Sunday, 19 August 2018

Dry Garden Nail Art.

Hello lovely people!

I hope you're all doing well.

It has been a nice, quiet weekend for me; I spent a good portion of yesterday in my pj's. It was fun, it has been a while since I've done that and today has just been nail art. Pretty much my ideal weekend - the only thing missing is reading, but I'll be doing that as soon as this post goes live. 

I decided to create a winter-ish design this week. Since it's still quite cold here and winter is showing no sign of leaving anytime soon, it gave me a chance to use some of the colours I don't very often get to. I also got to use another "new" plate!
I'm calling this one Dry Garden, due to the use of the dry brush technique, as well as the dark colours. 


These are the nail polishes I used:
Snuggle Me by Face Of Australia
Instant Adventure by Essence
Mixetaupe by Essie
Black Stamping Polish by Emily de Molly
Kwik Dry Top Coat by Sally Hansen
Top and Base Coat by Rimmel

I also used these tools:
Stamping Plate BP-79 by Born Pretty
Large Clear Stamper
Scraper
Liquid Latex by Lulaa


I started with Top and Base Coat. After drying, I applied two coats of Mixetaupe. Taking Snuggle Me, I wiped off the excess polish from the brush using the neck of the bottle. Once I felt I had the right amount of polish on the brush, I gently swiped it across the nail in varying directions. I continued this for all five nails, reapplying when necessary.
The same was done with Instant Adventure, making sure to leave enough of the base colour showing through.
Next, I applied liquid latex around each nail, then allowed to dry before continuing. I then gathered my stamping tools (see list above). Taking stamping plate BP-79, I applied Black stamping polish over the image, scraped off the excess, picked up the design with the stamper and pressed it onto the nail - rolling the stamper back and forth to make sure the whole image transferred correctly. Again, doing this for all five nails, making sure to clean the stamping plate and stamper between each use.
Once the stamps were dry, I applied a coat of Kwik Dry Top Coat to seal it all in.


I really liked this one.
I think it has a bit of an elegant feel to it, which I'm not so good at because, to be honest, I am not exactly very elegant myself! Hahaha!
I do like to dabble though. Besides, I like to do anything and everything on my nails.

I'm also trying to create more winter-themed nails, using those deep cozy colours. Every time I go searching online for ideas on winter nails, all I get is a bunch of snow related stuff, which is frustrating because it only snows in certain areas here, so it seems a little silly for me to do designs like that. 
I also get a lot of Christmas ones, which I don't even like to do during the holiday seasons. I'm not going to start doing them now. 

What do you think?
What do your winter nails look like?
Leave me a comment below with links to your nail art so I can check it out.

Are you following me on Instagram?
If not, you should be!

Thanks for stopping by!

Sunday, 8 April 2018

A Touch of Glamour Nail Art

Hello everyone.

I'm back again for some nail fun! I haven't really been doing my nails as much as I would like, but I do have some designs on hand to keep me going for a while. I'm also struggling with design ideas and inspiration, so I'm trying to work on that. What do you do to find inspiration for new designs?

This week's nail art is simple, easy and fun - with a little bit of glamour, just because. I recently purchased this awesome glitter top coat which I couldn't wait to try. This nail art is designed around the top coat. 

A Touch Of Glamour

I used these polishes:
Go With The Flowy By Essie
Pour Some Glitter On Me! By Essence
Don't Be Too Shy To Shine By Essence
Kwik Dry Top Coat by Sally Hansen
Big Matte Top Coat by Sally Hansen
Ready To Take Off by UNT Cosmetics

I also used these items:
Make up sponge

A Touch Of Glamour with Go With The Flowy

Creating this mani was fairly quick and easy. I started with Ready To Take Of peel off base coat. There's a lot of glitter in this nail art so peel off base is the only option. After allowing plenty of time to dry, I applied two coats of Go With The Flowy to each nail. Taking a make up sponge, I applied Don't Be Too Shy To Shine to a small section of the sponge and gently dabbed it onto the tips of my nails, avoiding my ring finger. I continued to dab until the very tip was covered, and I also tried to space out the middle section. I applied two coats of Pour Some Glitter On Me!, followed by a coat of Kwik Dry Top Coat to all nails, then a coat of Big Matte Top Coat over my ring finger. I don't trust these toppers like this, so I applied the Kwik Dry to seal it, and Big Matte to keep the intended look of this polish. 

A Touch Of Glamour with Pour Some Glitter On Me!

I bought all three of these polishes on the same day. I have a bad habit of needing to create designs with polishes I purchase together, and these seem to go together so well!
I really loved this design.
It might be simple, but it looks so fancy! This sequin matte top coat is fantastic. At first glance in the bottle it just looks like a ton of glitter, but it actually transfers to the nail, and it only took two coats for my nail to be mostly covered with minimal effort. It is a little hard to completely cover the nail due to the size of glitter, but it was much easier than doing one piece at a time - I do not have the patience 
for that!

Additionally, this was so satisfying to peel off, especially the accent nail. I kept looking at it once it was off, it was just so fascinating!

What do you think? 
Do you love this as much as I do?

Thanks for stopping by! 

Sunday, 18 March 2018

Marble & Stamping Nail Art Design


Hello everyone,

I just wanted to start by saying sorry for my extended absence recently. I have had a lot going on in my personal life, some good and some not so good things which have kept me occupied. Unfortunately, I have been a little too busy to do my usual weekly posting or even nail art in general!

It appears that the dust is finally settling and things are returning to some form of normal. In my time away, I have made a few changes. I'm currently playing with the idea to change the day I put out new posts, although I'm undecided on when/if that will happen. I am still very interested in doing this blog, because I do enjoy it and it's a little bit of a routine I'd like to keep. So, all I can ask is that you bare with me over the next few weeks until everything comes together. With that, let's get onto the nail art!

I have mentioned in other posts that I want to start doing more involved nail art, so I decided to throw a few things into one design and created a marble background with stamping over top. I have these seriously beautiful stamping polishes from Hit The Bottle and they're just sitting there looking pretty, so I'm breaking them out and giving them some time to shine. If you'd like to know how I created this mani, keep reading.


I used these polishes:
Big Primer Base Coat by Sally Hansen
Sparkling Cyan-ide by Hit The Bottle
Paint The Town Violet by Hit the Bottle
Lady In Black by OPI
Blanc by Essie
Cocktail Bling by Essie
Kwik Dry Top Coat by Sally Hansen

Side note, these nails were done about three weeks ago, and I forgot to take note of which grey I used so there's a possibility it could also be Sunny London by Essence.

The products used are:
Stamping Plate 181 by Born Pretty
Plastic Scraper
Large Clear Stamper
Liquid Latex by Lulaa
Thin Striping Brush


I started with one coat of Big Primer base coat, allowed to dry then applied two coats of Blanc for the base. Whilst drying I applied liquid latex around each nail. Using Blanc, Lady in Black and Cocktail Bling, I applied a few drops of each polish to my stamper. I tried to use as little black as possible as it tends to overpower the other colours. I then pressed the stamper onto the nail, rolling and dabbing to get a good blend of colours. Once I was satisfied with the marble, I used an orangewood stick to remove excess polish around the nail and removed the latex. I repeated this for all nails. Once I had finished stamping the marble design, I decided to add just a little more black. Using my thin striping brush and Lady in Black, I created some thin wavy lines. I then used a little bit of acetone to blend it out. For the stamping, I reapplied liquid latex to each nail. After drying, I grabbed my stamping plate, stamper, scraper and Paint The Town Violet. I painted the polish over the portion of design I wanted, then scraped off the excess. Picking it up with the stamper, I quickly pressed the image onto the nail, then removed the latex. I did the same for all nails, except switching to Sparkling Cyan-ide for my middle and pinky nails. To finish off the nail art, I applied a Kwik dry top coat.


I thoroughly enjoyed this design. It was so fun to create and even more fun to wear! I'm sure everyone went through that marble stone obsession that took over the internet in the last year or so, but I'm still stuck on it. 
I love the way these stamping polishes look over the marble. Especially this enchanting blue! It's such a beautiful colour. I wanted it on all of them, but I thought the purple would look just as good. I think I was right, ha ha.

What do you think?
Are you still obsessed with marble too?


Thanks for stopping by!

Sunday, 28 January 2018

Blues Jeans Nail Art

Hello beautiful people!

I hope all my fellow Aussies enjoyed Australia Day! I am somewhat ashamed of myself this year. I, the creator of the AustraNailian, did not do Aussie nail art! I didn't realize until it was too late and here we are, the Australia day long weekend and I'm not wearing my pride. I am going to have to make up for this next year, with several nail art designs just for Australia. 

Since I am such an unorganized person, you'll just have to deal with what I have got for you today. I've seen heaps of people do similar designs to this one, but I bought this particular polish from Essence that claimed to be 'denim effect', so obviously, I had to create something resembling Blue Jeans. Keep reading to see what I used & how I created this cute design.

Blue Jeans Nail Art

To create this design I used these polishes:

Start The Blue Rebellion! by Essence
Alpine Snow by OPI
Be Happy by Chi Chi Cosmetics
Sun Kissed by Sally Hansen 
Ready To Take Off Peel off base coat by UNT

I also used these tools:

Short striping brush
Small dotting tool
Plastic bag
Acetone
Paper towel

Blue Jeans Nail Art with Start The Blue Rebellion!

I started with one coat of Ready to Take Off and allowed to dry, then applied two coats of Start The Blue Rebellion!. Whilst drying, I grabbed my striping brush, dotting tool and bag. I then applied small drops of Alpine Snow, Be Happy and Sun Kissed to a plastic bag. After making sure my polish was dry, I dipped the striping brush into Alpine Snow and made small lines around the edge of my middle nail. Continuing with Alpine Snow, I made a small pocket shaped outline on my index nail using the same small lines as before. I then grabbed my dotting tool, dipped it into Alpine Snow and made a flower design by applying one dot to the center of my accent nail, then placed dots around it. I cleaned off the dotting tool by dipping it into some acetone and rolling it over a paper towel. I then used Be Happy to place smaller dots over the flower, taking care to not completely cover it. Cleaning my tool again, I moved to Sun Kissed and placed one small dot in the center of the flower. I didn't apply top coat on this design because I thought it might detract from the denim effect of the polish underneath. 

Blue Jeans Nail Art with Be Happy 

This design was super quick and easy, probably the easiest I've done in a while. I really liked the effect of this polish, definitely reminded me of those good old blue jeans everyone seems to own. I felt the design needed a little more than just stitching so I added the flower as one of those iron-on patches. This one feels like a 70's style, totally accidental, but I like it.

What do you think?
Do you like the look of the denim effect?

Thanks for stopping by!

Sunday, 7 January 2018

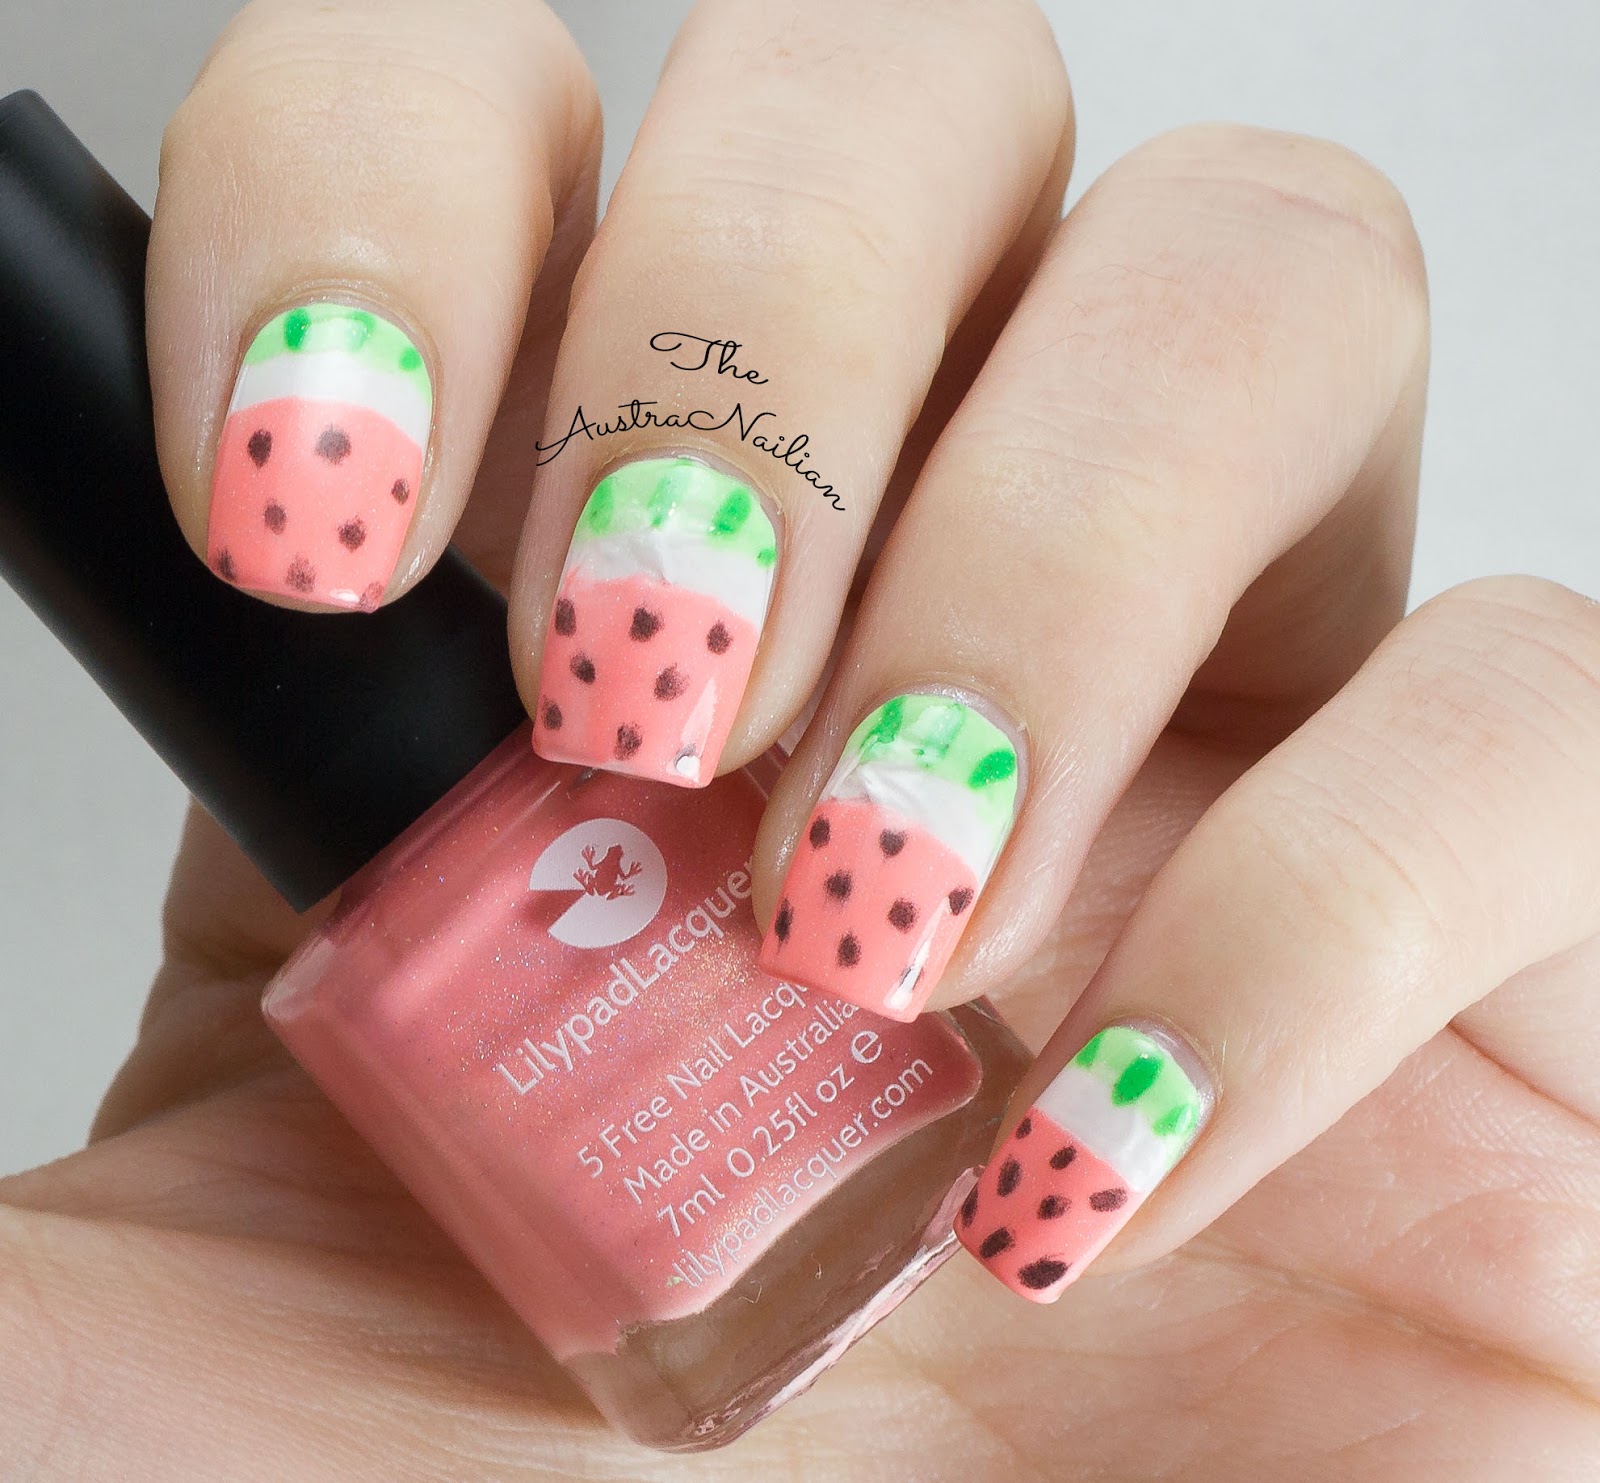
Sweet Sweet Watermelon Nail Art


Hello everyone,

I hope you all enjoyed the holiday season, whether celebrated or otherwise. I have been enjoying some time out with friends and family as well as exploring the beauty of North East Victoria. And of course, stocking up on some new polishes. I think I picked up about 20 new ones over the last two weeks, woops! 

I thought I'd start 2018 off with a super sweet summer-perfect nail art. A fun Holo watermelon design! I am not really to keen on using holos/glitters and the like in my nail art design, but I'm trying to get around that because I have some amazing Holo's that I don't often get to use, not to mention the thousands more I want to get my hands on. So, I decided to go all out with this one, holo everything! Well, almost. I also used a shimmer. Not that you can really see in these photos, but that's okay, I know it's there. Keep reading for a list of nail polish and tools I used to create this nail art design. 

Sweet Sweet Watermelon Nail Art

I used these polishes:
Paradise Punch by Lilypad Lacquer
Lime Zinger by Lilypad Lacquer
Mint Mojito by Lilypad Lacquer
Be Happy & Smile by Essence
Suzi Skis In The Pyrenees by OPI
Ready To Take Off by UNT
Kwik Dry Top Coat by Sally Hansen

The tools I used are:
French Tip Guides
Short striping brush


Sweet Sweet Watermelon with Paradise Punch


To create this nail art design, I started with with Ready to Take Off, then applied two coats of Be Happy & Smile as my base colour. Once dry, I applied Kwik Dry Top Coat. Giving this ample time to dry, I got Paradise Punch & Mint Mojito ready to go. I placed the french tip guide slightly above the middle of the nail, making sure to press them down tightly to avoid bleeding. Once in place, I applied Mint Mojito closest to the cuticle & Paradise Punch on the opposite side. Once I was satisfied with the opacity and prior to drying, I removed the guide. As you can see, with the first nail it was quite easy to remove, but as I went along it got harder and harder to remove each of the guides. This is because of the peel off base coat I used. I should have applied the guides to the nail as I did each one, rather than putting them all on at once. Lesson learned!
Moving on, I then took my short striping brush with Lime Zinger and created small lines over Mint Mojito. After cleaning the brush, I used Suzi Skis In The Pyrenees to create the seeds. I then finished off with a Kwik Dry Top Coat.


Sweet Sweet Watermelon with Mint Mojito

This is a design I've wanted to try doing for ages! I have no idea why it has taken this long, but I'm pretty happy with how it turned out, despite the lifting. I hoped the top coat would help weigh it down, but it clearly didn't. I have learned my lesson, though. This is not the first time this has happened, however I hope it's the last. I guess you could call this a bit of a nail fail.

On a side note, I always find it funny that most watermelon designs have seeds, considering most people hate seeds in the fruit, but I suppose it does add to the whole design. I think if I were to do this again, I'd probably use a dotting tool instead of the brush for seeds, as most of these look pretty terrible. 

What do you think?
Have you done this popular design?

Thanks for stopping by! 

Sunday, 3 December 2017

Peachy Smoosh Marble & Stamping Nail Art

Hey everyone, 

It is officially summer here in the land of Oz! Not that you'd ever know it was anything other than winter in Victoria, but nonetheless, still summer... which means bright, fun, colourful manis that I am so ready for!
So, as you know, I have all these super cute stamping polishes from Hit The Bottle and I've been a little scared to use them. This week I decided to let loose and just go for it. I didn't just want to do stamping, so I decided to mix in my favorite nail art technique, Smoosh Marble! Here's what I've got for you this week, peachy smoosh marble & stamping.

Peachy Smoosh Marble & Stamping Nail Art
For this fun design I used these polishes:


Big Primer Base Coat by Sally Hansen
Apricot Cockatoo by Essence
Tipsy Grasshopper by Hit The Bottle
Sparkling Cyan-ide by Hit The Bottle
Drunk Tank Pink by Hit The Bottle 
Paint The Town Violet by Hit The Bottle
Kwik Dry Top Coat by Sally Hansen

These products were also used:

BP-98 Stamping Plate by Born Pretty
Liquid Latex by Lulaa
Large clear stamper


Peachy Smoosh Marble Nail Art with Sparkling Cyan-ide
I started with Big Primer base coat. After drying, I applied two coats of Apricot Cockatoo. Whilst that was drying, I applied Lulaa latex around my middle and ring fingers. Taking stamping plate BP-98, I applied small dots of Tipsy Grasshopper, Sparkling Cyan-ide, Drunk Tank Pink and Paint the Town Violet to the design, then scraped it a few times to blend the colours. I then quickly picked up the design with my large stamper and pressed it over my ring finger. I removed the latex from this finger and cleaned up around the nail where necessary. Moving onto my middle finger, I grabbed my stamper and dropped small amounts of Tipsy Grasshopper, Sparkling Cyan-ide, Drunk Tank Pink, Paint the Town Violet and Apricot Cockatoo on to it. I then pressed the stamper over my nail, spreading the polish out. I continued to stamp over the nail until I was satisfied with the colour distribution, then removed the latex and cleaned up. I finished off with Kwik Dry top coat. 

Peachy Smoosh Marble Nail Art with Apricot Cockatoo

I am happy with how this turned out, although I feel the stamp was a little duller than I was hoping for. I may have over done the scraping,  causing less polish to be left on the design. But this smoosh is awesome! I think it looks like a grungy, arty, delightful mess and that's super fun. 

What do you think? 

Don't you just love these bright stamping polishes?

Thanks for stopping by! 

Sunday, 15 October 2017

Pastel Grunge Dry Brush Nail Art


Hello everyone.

I hope you're all doing well. It's currently a lovely sunny day here. I am enjoying being able to have my windows open and letting that beautiful breeze in. It's a nice change from the icy winds and grey skies last weekend. 

This week's nail art is one of my all time favorite techniques, dry brush. In fact, you can see me using the same one here & here. This is the beauty of the dry brush, as you can see, each mani is always totally different. You can use as many or as little colours as you like and it always seems to work.

So here's my finished mani. Below I'll list all the products I used and my method to achieve this really cute and grungy dry brush nail art, as well as a some photos.

Pastel Grunge Dry Brush Nail Art

These are the products I used to create this pastel grunge nail art:

Be Happy + Smile by Essence
Funny Face by Essie
Orchid by piCture pOlish
Lady In Black by OPI
Camo Coat by Celestial Cosmetics
Kwik Dry Top Coat by Sally Hansen

Pastel Grunge Dry Brush Nail Art with Be Happy + Smile

I applied three coats of Be Happy + Smile as my base. This colour is a little sheer so it does require that additional coat for complete opacity. However, you could probably get away with two coats - being that this is a grunge style, it could add a little more depth to the mani. Once dry, I used Camo Coat around each finger for easier clean up. I have a seriously bad habit of making a huge mess with this technique and although the clean up is usually pretty minimal, I still prefer to use latex. Taking Funny Face, I used the bottle neck to wipe off as much excess polish as possible, then began lightly swiping across each nail in different directions. Occasionally I like to re-dip and wipe as the brush tends to get very dry (duh) and awkward to use. Polish tends to dry very fast when doing this as there is only a small amount of polish on the nail. By the time I'd completed all five nails, I was able to move onto the next colour, Orchid, straight away. I did the same thing with this polish, wipe off excess and lightly swipe. I then used Lady In Black in the same way again. I let black dry a little longer as I wanted to avoid any smudging when applying the trusty Kwik Dry Top Coat to finish.

Pastel Grunge Dry Brush Nail Art with Funny Face

I am really pleased with how this turned out. I feel like it suits my personality so well. Light and fun with a little bit of darkness. I was originally going to use white as a base, but I decided that it would be too vibrant and I didn't want that. This pearly, dusty pink is actually perfect. Not to toot my own horn or anything, but I made a good choice. Haha. 

These colours seem to go together so well. If I had of used another colour, I think I might have ruined the design. Some times, less really is more.  

Pastel Grunge Dry Brush Nail Art with Orchid

That's all for today! I hope you enjoyed my post this week.
What do you think?
Do you love dry brush as much as I do?
Leave me a comment below, I'd love to get your feedback. 


Thanks for stopping by!

Sunday, 6 August 2017

Autumn Leaves Nail Art

Hey lovely people.
I hope everyone's enjoying the weekend. 
This design is a bit autumn; even though we are in the final month of winter, it still works and it's very pretty!

Autumn Leaves with G'day Matte - piCture pOlish

I really enjoyed creating this nail design. It was fun and turned out much better than I was hoping for. The colours work really well together and the matte effect just makes the whole thing.

Autumn Leaves with Cherry Red - Sally Hansen

For this design, I used the following items:
Cherry Red - Sally Hansen
The "IT" Color - OPI
Sunny London - Essence
G'day Matte Top Coat - piCture pOlish
Camo Coat - Celestial
Stamper
Maple leaf nail stencils. 

Autumn Leaves with Sunny London - Essence
I started with two coats of Sunny London as a base. Once dry, I applied a quick dry top coat. I used Camo Coat around my middle and ring finer nails to protect my skin, then applied the stencils to my middle and ring finger nails. After making sure they were securely adhered to the nail, I dropped a few drops of The "IT" Color and Cherry Red onto a stamper and dabbed it on to the nail, over the stencils. I did this one nail at a time, making sure to remove the stencil as soon as I was happy with the design. After allowing them to dry, I applied a quick dry top coat, then G'day Matte Top Coat to finish the look. 

Autumn Leaves Nail Art Design

That's all there is to it! I am really happy with how the smoosh marble turned out on the leaves. It actually looks realistic, which I am heaps happy about. What are your thoughts? Let me know!

Thanks for stopping by!

Sunday, 28 May 2017

Pink Daisy Dotticure Nail Art

Hello Hello you lovely people!

I hope everyone is having a good weekend! 

Just a quick side note, I'll be away for the next few weeks so I may not be able to get posts out. But do not fret, as I will be back as soon as I can.

This week is a deceivingly simple design! I was feeling a little lazy, so I decided to do something quick & easy. This is the Pink Daisy Dotticure. 

Pink Daisy Dotticure

For this design I used the following colours & tools:
The "IT" Color - OPI
Apricot Cockatoo - Essence
Mexican Madness - Australis
Small dotting tool

Pink Daisy Dotticure with The "IT" Color - OPI

To create this design I applied two coats of Apricot Cockatoo for my base. After allowing ample time to dry, I took my dotting tool and dipped it into Mexican Madness, then made small circles by placing four to five dots next to each other, creating petals. I also placed a few loose dots to fill in the space between the flowers. After allowing this to dry and cleaning my dotting tool, I used The "IT" Color to place dots in the center of each flower. Once complete, I applied a quick dry top coat. 

Pink Daisy Dotticure
This is so simple and so cute! It just makes me want to smile every time I look at it! I think using the pastel base makes it look even more floral. Surprisingly, I think these colours all go very well together. 

Pink Daisy Dotticure with Mexican Madness - Australis
I would also just like to apologize for the mess of my cuticles at the moment. I somehow managed to get a paper cut on one of them recently which I just had to wait out. Also, due to the colder weather, my hands have become very vulnerable and I just can't get enough moisturizer or oil on them. 

So that's it for today! 
What do you think? 
Would you do something like this?
I need to do more dotticures!

Thanks for stopping by! 

Sunday, 2 April 2017

Distressed Sunset

Hello all! 

I hope everyone is doing well! This week has once again flown by! Before I know it, it'll be Christmas again. 


Today I have mixed two of my favorite techniques - dry brush & gradient - together to get this awesome design I call Distressed Sunset. It's edgy and cute at the same time. I love wearing this design.

Distressed Sunset Glossy Top Coat


The photo above is with a glossy top coat, but I ended up using a matte top coat to finish and I love the way it looks, I think it plays well with the pastel tones used and it kind of subdues the black so it's not as harsh. 


Distressed Sunset with glossy top coat & Barbie Boy - Chi Chi
So for this mani I used to the following
Barbie Boy - Chi Chi
Apricot Cockatoo - Essence
Lady In Black - OPI
Big Kwik Dry Top Coat - Sally Hansen
G'Day Matte Top Coat - piCture pOlish
Camo Coat - Celestial.

Distressed Sunset with Matte Top Coat
This was fairly simple. I applied two coats of Apricot Cockatoo & allowed to dry, then applied Kwik Dry top coat. I used Camo coat around my nails for easier clean up from the gradient. Once both were dry, I applied Apricot Cockatoo & Barbie Boy to a cosmetic sponge and dabbed it on all of my nails until a good opacity was reached. I removed the Camo coat once I was happy & cleaned up my cuticle areas with acetone and a clean up brush. Once the gradient was dry I applied Kwik Dry top coat to smooth it out. After drying, I took Lady In Black and wiped off as much excess polish as possible from the brush and applied it sporadically on all but one nail. Finished with G'Day Matte top coat, and voila! Here we have it. 

Distressed Sunset with Matte Top coat & Barbie Boy - Chi Chi
 As you have probably gathered by now, dry brush is my absolute favorite technique, and quite often my go-to. I've done a few others you can see here & here. Be sure to keep an eye out, as you will definitely see more of this. I've not done it like this before as I always thought it looked best over white, but I am slowly and surely expanding my horizons! 

Distressed Sunset with Matte Top Coat & Apricot Cockatoo - Essence
What are your two favorite techniques? Have you crossed them over before? Let me know and leave me links, I'd love to check them out!

Thanks for stopping by!


Sunday, 19 March 2017

Matte Stamping & Gradient with piCture pOlish

Welcome back lovely people!

I finally caved and bought me some piCture pOlish nail polish recently. They have a matte top coat called 'G'day Matte' which I thought was totally appropriate for The AustraNailian! So, of course I had to get it. I also purchased another awesome polish called 'Orchid' - a beautiful purple with silver holo flakes - and that is what inspired today's design.

Matte Stamping & Gradient
I also used Essence - Queen Of The Amazon which is a purple plum shimmer, Born Pretty - White stamping polish, Celestial - Camo Coat & QGirl stamping plate - 035.

This design was fairly simple. I applied two coats of Orchid on four of my nails, two coats of Queen Of The Amazon on my ring finger and allowed them to dry. Using plate 035 & white stamping polish, I stamped the design on top of the Orchid. Using Camo Coat to protect my skin, I applied Orchid & Queen Of The Amazon on a sponge to make a gradient on my ring finger. I applied a quick dry top coat to all and finished with G'day Matte top coat over the stamping designs, leaving the gradient with the shiny top coat.

Matte Stamping & Gradient with Orchid - piCture pOlish
I thought it would be interesting to have two different finishes on this design and I believe I am right. It looks awesome.

This Matte top coat is making me fall in love with matte designs. I have never really been a fan, but I guess I just didn't have the right formula. Keep an eye out, I plan on using this one at lot more.  

Matte Stamping & Gradient Nail Art Close Up
What are your thoughts? Have you done different finishes in one mani? Would you do this?
Leave me a comment and let me know. 

Matte Stamping & Gradient with QGirl Plate - 035
That's all for today, so thanks for stopping by!