Showing posts with label nail art design. Show all posts

Sunday, 22 July 2018

Chevron Nail Art

Hi all!
I hope everyone is doing well!I didn't think I was going to make it in time for this post today. My computer is slowly on the way out and I have a bad habit of leaving my photo editing until the last minute, which means I was about ready to give up.
But, I got it together and here we are!

This week I was inspired by a canvas I found on Pinterest. It looked so exciting, so I decided to put my own spin on it and turn it into a nail art design. I did keep it a little less messy, simply because I did not want to spend too long on clean up (I'm a bit lazy, ha ha). It's a combination of dry brush and chevron vinyls. Dry brush being my favorite technique and chevrons being my favorite pattern (besides paisleys, but that's a different story).

Chevron Nail Art

For this design, I used these polishes:
In Your Elemelon by Sinful Colors
Wonder Mint by Sinful Colors
Acid Test by Sinful Colors
Lilac Out Loud by Sinful Colors
Lady In Black by OPI
Nail Base & Top Coat by Rimmel
Kwik Dry Top Coat by Sally Hansen
Big Matte Top Coat by Sally Hansen

As well as these products:
Chevron Vinyls

Chevron Nail Art with Lilac Out Loud

I started this design with Nail Base & Top Coat, then applied two coats of In Your Elemelon. After allowing this to dry, I grabbed Lilac Out Loud. Using the neck of the bottle, I wiped the excess polish off the brush, then swiped the brush across each nail in various directions.
I repeated this with Wonder Mint and Acid Test, taking care not to overpower the In Your Elemelon underneath. I did go back in with Lilac Out Loud to make sure it came through. This dries pretty quickly, so I was able to do one colour after the other.
Once I was happy with the dry brush, I applied a coat of Kwik Dry Top Coat. I allowed the top coat to dry completely so I could apply the vinyls without ruining the whole design.
I placed two thin chevron vinyls on the lower half of my index finger (I only had thin ones, but you could use thick ones if you would prefer), making sure there was no space between them. I then applied two on my middle finger, leaving space between them. Skipping my ring finger, I placed two more on my pinky nail in the center, again, making sure there was no space between them. Before moving on, I made sure each vinyl was secured to the nail. Using Lady In Black, I painted over all nails except my ring finger nail, removing the vinyls before moving onto the next nail to avoid making a mess.
After allowing Lady In Black to dry, I applied Kwik Dry Top Coat. 

To complete the design, I applied Big Matte Top Coat.

Chevron Nail Art with Acid Test

I was pretty happy with the final look. It's not exactly like the image I got the inspiration from, but that's how inspiration works!
This one was fun to wear as I love chevrons, pastels and black... so all my favourites were covered in this design!
Most of these Sinful Colors are from their Pastel Neon Matte collection, so they're obviously made to go together. I do wish I had the whole collection, though!

What do you think?
Where do you find your inspiration?
Let me know by leaving a comment below, or find me on social media here.

Thanks for stopping by!  

Sunday, 8 April 2018

A Touch of Glamour Nail Art

Hello everyone.

I'm back again for some nail fun! I haven't really been doing my nails as much as I would like, but I do have some designs on hand to keep me going for a while. I'm also struggling with design ideas and inspiration, so I'm trying to work on that. What do you do to find inspiration for new designs?

This week's nail art is simple, easy and fun - with a little bit of glamour, just because. I recently purchased this awesome glitter top coat which I couldn't wait to try. This nail art is designed around the top coat. 

A Touch Of Glamour

I used these polishes:
Go With The Flowy By Essie
Pour Some Glitter On Me! By Essence
Don't Be Too Shy To Shine By Essence
Kwik Dry Top Coat by Sally Hansen
Big Matte Top Coat by Sally Hansen
Ready To Take Off by UNT Cosmetics

I also used these items:
Make up sponge

A Touch Of Glamour with Go With The Flowy

Creating this mani was fairly quick and easy. I started with Ready To Take Of peel off base coat. There's a lot of glitter in this nail art so peel off base is the only option. After allowing plenty of time to dry, I applied two coats of Go With The Flowy to each nail. Taking a make up sponge, I applied Don't Be Too Shy To Shine to a small section of the sponge and gently dabbed it onto the tips of my nails, avoiding my ring finger. I continued to dab until the very tip was covered, and I also tried to space out the middle section. I applied two coats of Pour Some Glitter On Me!, followed by a coat of Kwik Dry Top Coat to all nails, then a coat of Big Matte Top Coat over my ring finger. I don't trust these toppers like this, so I applied the Kwik Dry to seal it, and Big Matte to keep the intended look of this polish. 

A Touch Of Glamour with Pour Some Glitter On Me!

I bought all three of these polishes on the same day. I have a bad habit of needing to create designs with polishes I purchase together, and these seem to go together so well!
I really loved this design.
It might be simple, but it looks so fancy! This sequin matte top coat is fantastic. At first glance in the bottle it just looks like a ton of glitter, but it actually transfers to the nail, and it only took two coats for my nail to be mostly covered with minimal effort. It is a little hard to completely cover the nail due to the size of glitter, but it was much easier than doing one piece at a time - I do not have the patience 
for that!

Additionally, this was so satisfying to peel off, especially the accent nail. I kept looking at it once it was off, it was just so fascinating!

What do you think? 
Do you love this as much as I do?

Thanks for stopping by! 

Sunday, 25 March 2018

Autumn Dotticure

Hello lovelies!

Wow, is it really Sunday already? Feels like just yesterday I was sitting here writing last week's post. I can't believe how quickly it has gone, but I'm glad to be doing another post.

We're finally getting some of that awesome autumn weather, so this is probably the best time to do my first Autumn nail art of the season - a cute little dotticure with rich, dark colours. I don't have many autumn colours as the only dark polish I really like is black. However, I do have a tendency to pick up discounted ones when they're a good brand or just super cheap. The colours I used in this nail art design are both Essie, which I picked up for about $8 each - a great bargain as they they usually go for $15 here in Australia. Keep reading for the details on these nails.

Autumn Dotticure
Polishes used for this mani:
In The Lobby by Essie
Frock 'n Roll by Essie
Ready To Take Off by UNT Cosmetics
Kwik Dry Top Coat by Sally Hansen

Tools I used were:
Small Dotting Tool
Medium Dotting Tool
Plastic Sandwich Bag. 

Autumn Dotticure with In The Lobby

To create this design I started with one coat of Ready To Take Off. I used the peel off base coat to avoid any staining to the nail and my fingers when removing the dark polish. After allowing ample time to dry, I applied two coats of In The Lobby. Whilst drying, I collected my dotting tools and a plastic sandwich bag. Once I was sure the base polish was dry, I applied a drop of Frock 'n Roll on the sandwich bag. Taking the medium dotting tool, I dipped it in the polish on the bag and then began placing dots in various places on the top half of the nail. I did the same with the small dotting tool until I was satisfied with the coverage. I continued this on all nails, placing some dots further down the nail and leaving varying spaces between to try and create an uneven design. Giving the dots time to dry, I finished with Kwik Dry Top Coat. 

Autumn Dotticure with Frock 'n Roll

This was a nice easy one (dotticures always are). They're so simple to modify as well, you can basically use any colours to suit you or your situation. I thought this nail art would be perfect for work; as the colours are so similar, indoor lighting made them look like one colour. In the sunlight, however, the difference really came through. 

I also really liked having dark colours on my nails again, it was fun to mix it up a little bit. Maybe I'll continue with the dark colours through the rest of the season.

Do you like this design?
What's your favorite autumn nail polish?

Thanks for stopping by!

Sunday, 18 March 2018

Marble & Stamping Nail Art Design


Hello everyone,

I just wanted to start by saying sorry for my extended absence recently. I have had a lot going on in my personal life, some good and some not so good things which have kept me occupied. Unfortunately, I have been a little too busy to do my usual weekly posting or even nail art in general!

It appears that the dust is finally settling and things are returning to some form of normal. In my time away, I have made a few changes. I'm currently playing with the idea to change the day I put out new posts, although I'm undecided on when/if that will happen. I am still very interested in doing this blog, because I do enjoy it and it's a little bit of a routine I'd like to keep. So, all I can ask is that you bare with me over the next few weeks until everything comes together. With that, let's get onto the nail art!

I have mentioned in other posts that I want to start doing more involved nail art, so I decided to throw a few things into one design and created a marble background with stamping over top. I have these seriously beautiful stamping polishes from Hit The Bottle and they're just sitting there looking pretty, so I'm breaking them out and giving them some time to shine. If you'd like to know how I created this mani, keep reading.


I used these polishes:
Big Primer Base Coat by Sally Hansen
Sparkling Cyan-ide by Hit The Bottle
Paint The Town Violet by Hit the Bottle
Lady In Black by OPI
Blanc by Essie
Cocktail Bling by Essie
Kwik Dry Top Coat by Sally Hansen

Side note, these nails were done about three weeks ago, and I forgot to take note of which grey I used so there's a possibility it could also be Sunny London by Essence.

The products used are:
Stamping Plate 181 by Born Pretty
Plastic Scraper
Large Clear Stamper
Liquid Latex by Lulaa
Thin Striping Brush


I started with one coat of Big Primer base coat, allowed to dry then applied two coats of Blanc for the base. Whilst drying I applied liquid latex around each nail. Using Blanc, Lady in Black and Cocktail Bling, I applied a few drops of each polish to my stamper. I tried to use as little black as possible as it tends to overpower the other colours. I then pressed the stamper onto the nail, rolling and dabbing to get a good blend of colours. Once I was satisfied with the marble, I used an orangewood stick to remove excess polish around the nail and removed the latex. I repeated this for all nails. Once I had finished stamping the marble design, I decided to add just a little more black. Using my thin striping brush and Lady in Black, I created some thin wavy lines. I then used a little bit of acetone to blend it out. For the stamping, I reapplied liquid latex to each nail. After drying, I grabbed my stamping plate, stamper, scraper and Paint The Town Violet. I painted the polish over the portion of design I wanted, then scraped off the excess. Picking it up with the stamper, I quickly pressed the image onto the nail, then removed the latex. I did the same for all nails, except switching to Sparkling Cyan-ide for my middle and pinky nails. To finish off the nail art, I applied a Kwik dry top coat.


I thoroughly enjoyed this design. It was so fun to create and even more fun to wear! I'm sure everyone went through that marble stone obsession that took over the internet in the last year or so, but I'm still stuck on it. 
I love the way these stamping polishes look over the marble. Especially this enchanting blue! It's such a beautiful colour. I wanted it on all of them, but I thought the purple would look just as good. I think I was right, ha ha.

What do you think?
Are you still obsessed with marble too?


Thanks for stopping by!

Sunday, 28 January 2018

Blues Jeans Nail Art

Hello beautiful people!

I hope all my fellow Aussies enjoyed Australia Day! I am somewhat ashamed of myself this year. I, the creator of the AustraNailian, did not do Aussie nail art! I didn't realize until it was too late and here we are, the Australia day long weekend and I'm not wearing my pride. I am going to have to make up for this next year, with several nail art designs just for Australia. 

Since I am such an unorganized person, you'll just have to deal with what I have got for you today. I've seen heaps of people do similar designs to this one, but I bought this particular polish from Essence that claimed to be 'denim effect', so obviously, I had to create something resembling Blue Jeans. Keep reading to see what I used & how I created this cute design.

Blue Jeans Nail Art

To create this design I used these polishes:

Start The Blue Rebellion! by Essence
Alpine Snow by OPI
Be Happy by Chi Chi Cosmetics
Sun Kissed by Sally Hansen 
Ready To Take Off Peel off base coat by UNT

I also used these tools:

Short striping brush
Small dotting tool
Plastic bag
Acetone
Paper towel

Blue Jeans Nail Art with Start The Blue Rebellion!

I started with one coat of Ready to Take Off and allowed to dry, then applied two coats of Start The Blue Rebellion!. Whilst drying, I grabbed my striping brush, dotting tool and bag. I then applied small drops of Alpine Snow, Be Happy and Sun Kissed to a plastic bag. After making sure my polish was dry, I dipped the striping brush into Alpine Snow and made small lines around the edge of my middle nail. Continuing with Alpine Snow, I made a small pocket shaped outline on my index nail using the same small lines as before. I then grabbed my dotting tool, dipped it into Alpine Snow and made a flower design by applying one dot to the center of my accent nail, then placed dots around it. I cleaned off the dotting tool by dipping it into some acetone and rolling it over a paper towel. I then used Be Happy to place smaller dots over the flower, taking care to not completely cover it. Cleaning my tool again, I moved to Sun Kissed and placed one small dot in the center of the flower. I didn't apply top coat on this design because I thought it might detract from the denim effect of the polish underneath. 

Blue Jeans Nail Art with Be Happy 

This design was super quick and easy, probably the easiest I've done in a while. I really liked the effect of this polish, definitely reminded me of those good old blue jeans everyone seems to own. I felt the design needed a little more than just stitching so I added the flower as one of those iron-on patches. This one feels like a 70's style, totally accidental, but I like it.

What do you think?
Do you like the look of the denim effect?

Thanks for stopping by!

Sunday, 21 January 2018

Hot Pink Aztec Inspired Nail Art

Hi everyone, 

I hope you've all had a good week. Mine seemed to drag and this heat is only making it worse. I almost didn't want to do my nails today! The mugginess is making me pretty lethargic, as I'm sure it does for most people. I'm not a huge fan of winter, but I am more than excited for it this year! I seriously miss the foggy hills and semi consistent rainfall, not to mention the massive amounts of lush greenery surrounding us. Also, the ability to go outside and actually enjoy it is a plus! 

Anyway, enough dreaming of the future, on with the nail art! Lately I've been trying to do more intricate looking designs. Layering and things like that. I think this is a pretty good example of what I'm aiming for. I have this thing for Aztec styled things at the moment, so I bought this awesome stamping plate that is full of Aztec inspired design which I have paired with some dry brushing and bright colours! Keep reading for the polishes, products and how I created this fun nail art.

Hot Pink Aztec Inspired Nail Art
For this design I used these polishes:

Material Girl by Chi Chi Cosmetics
Gold Rush Fever by ulta3
Black Satin by BYS Cosmetics
Black Stamping Polish by Emily de Molly
Big Primer Base Coat by Sally Hansen
Kwik Dry Top Coat by Sally Hansen


The products I used are:

BP-L048 Stamping Plate by Born Pretty
Large clear stamper
Scraper
Mani saver 
Cotton balls 
Liquid Latex by Lulaa 
Acetone

Hot Pink Aztec Inspired Nail Art with Gold Rush Fever

To create this design, I started with Big Primer Base Coat. Once dry, I applied two coats of Material Girls to all nails except my ring finger. I applied two coats of Black Stain to this nail, as I intended this to be an accent nail. I allowed this to dry while applying liquid latex around each nail. Taking Gold Rush Fever, I wiped the excess polish off the brush using the neck of the bottle and lightly stroked it across each nail, making sure to change directions for a distressed look. Once I was satisfied with the dry brushing, I removed the latex and re-applied. This is to ensure any polish on the latex doesn't dry too quickly and form a 'crust', which, in my experience makes clean up harder, therefore defeating the purpose of liquid latex. I then grabbed my stamping tools and Black Stamping Polish. I chose the design I wanted and applied enough polish to cover it, then taking my scraper, I scraped over the design to remove excess polish. I picked up the image using a large stamper and quickly pressed it onto the nail, then removed the latex. Taking my mani saver and a cotton ball dipped in acetone, I cleaned the stamping plate before proceeding. I repeated the previous steps for my ring finger, except using Material Girl to stamp with.
Lastly, I finished off with a coat of Kwik Dry Top Coat.

Hot Pink Aztec Inspired Nail Art with Material Girl

So a few things on this one.
Firstly, let me talk about this pink polish for a moment. It has to be one of my favorite pink polishes, in my opinion it is the perfect shade of hot pink. It also happens to be a pretty perfect colour for summer. I just adore it!

Now on to the gold. This is the best gold in my collection. I don't have all that many because it's not a preferred colour, but it's a good staple. This one is fabulous. I've said this before, but I am so grateful that I found ulta3 again, I'm really impressed by the polishes I have picked up so far!
These two colours together are an amazing combination, in my opinion.

I had originally intended to do stamping on all nails, but when I saw the pink and gold together I just knew they had to be shown off. Overall, I love this mani and enjoyed wearing it. I'd definitely do this combo again one day.

What do you think?
Are you as in love with these colours as I am? 

Leave me a comment and tell me what you think.

Thanks for stopping by. 

Sunday, 14 January 2018

Unicorn Smoosh Marble Nail Art

Hello people!

Wow, how fast has this week gone? It's a little crazy. Sucks that it's already Sunday afternoon... where did my weekend go? At least today has been relatively cool, I've been in trackies all day, in the middle of summer! There's not much better than spending a day at home in my comfy clothes.

Anyway, moving onto the actual topic of this blog; this week's nail art. I've used my go-to style, a simple smoosh marble using pastels and Unicorn heads! (No unicorns were hurt during the making of this mani!) I'll list the polishes and products I used to create this design.

Unicorn Smoosh Marble

These are the polishes I used:

Tingle by piCture pOlish
Pretty As A Peach by BYS Cosmetics
Isn't She Lovely by BYS Cosmetics
Lucky Ducky by BYS Cosmetics
Drunk Tank Pink stamping polish by Hit The Bottle
Big Primer Base Coat by Sally Hansen
Kwik Dry Top Coat by Sally Hansen

These are the tools I used:
Large Clear Stamper
Scraper
Stamping Plate BP-164 by Born Pretty
Liquid Latex by Lulaa

Unicorn Smoosh Marble with Pretty As a Peach 

For this nail art I started with an even coat of Primer Base Coat, then applied two coats of Lucky Ducky. While drying, I applied liquid latex around each nail. I then organised my polishes by lining them up near my stamper and opening them, leaving the brush in the bottle. Once the latex and polish was dry, I applied a few drops of Lucky Ducky, Pretty As a Peach, Isn't She Lovely and Tingle onto the stamper, then pressed it into the nail, moving it around and dabbing it over the nail to get the desired coverage. I then removed the liquid latex and continued this for each nail. Taking stamping plate BP-164, I applied Drunk Tank Pink over the design, and scraped off the excess polish. I picked up the design with the stamper and pressed it onto the nail. I only did this for two nails, as I love showing off the smoosh and it really doesn't need much to accentuate it. I finished off with Kwik Dry Top Coat. 


Unicorn Smoosh Marble with Drunk Tank Pink
This one is fun to look at. It reminds me of the classic Rainbow Paddle Pop, the official treat of summer as a kid. I so miss those delicious Paddle Pops. Plus, unicorns! It was not intentionally the look I was going for, just the way it turned out, but I'm happy with it. I kinda regret adding the second unicorn, I should have glammed up the middle finger and made it an accent nail. There's always next time! 


What do you think?
Also, what's your favorite summer treat?
Leave me a comment!

Thanks for stopping by!

Sunday, 7 January 2018

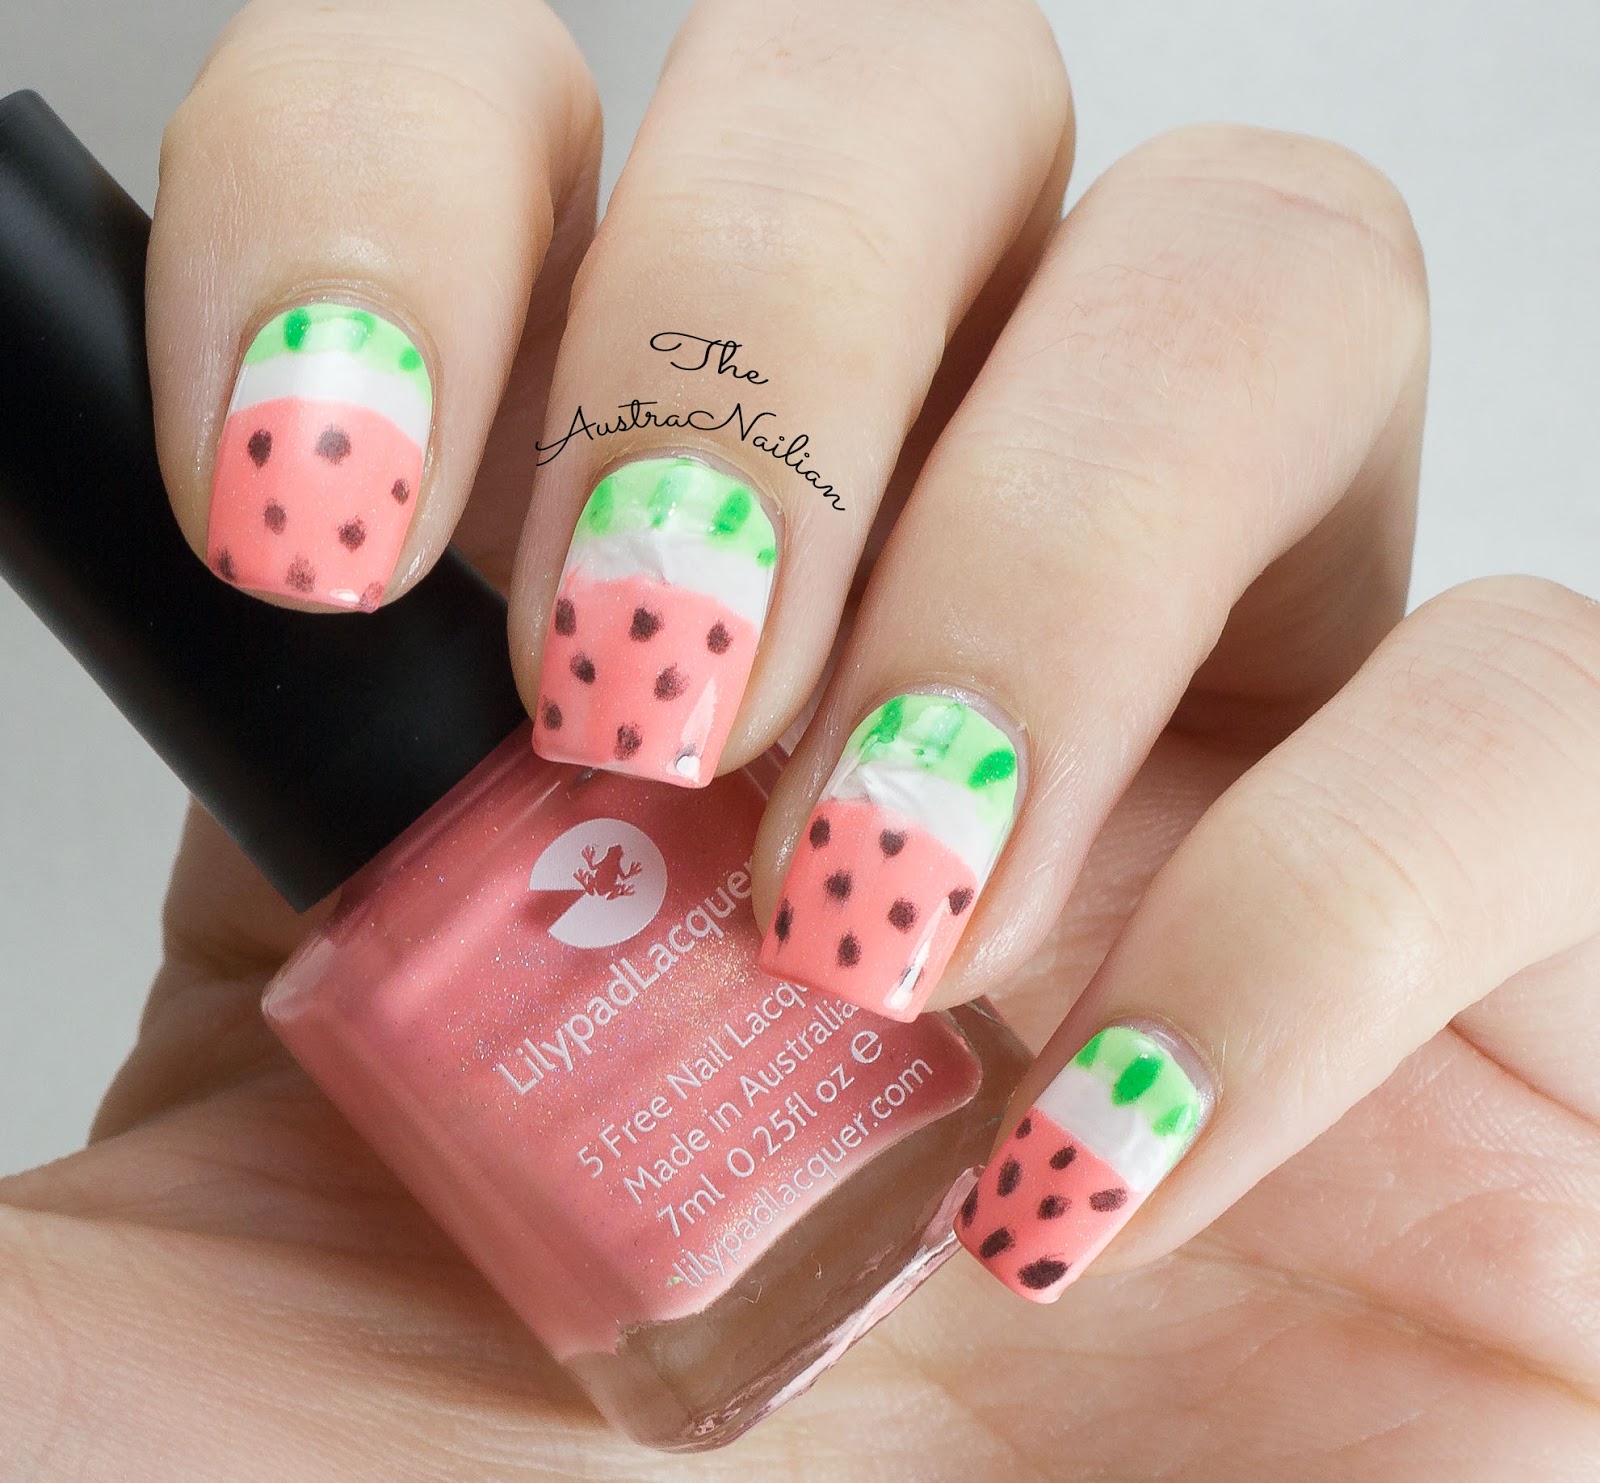
Sweet Sweet Watermelon Nail Art


Hello everyone,

I hope you all enjoyed the holiday season, whether celebrated or otherwise. I have been enjoying some time out with friends and family as well as exploring the beauty of North East Victoria. And of course, stocking up on some new polishes. I think I picked up about 20 new ones over the last two weeks, woops! 

I thought I'd start 2018 off with a super sweet summer-perfect nail art. A fun Holo watermelon design! I am not really to keen on using holos/glitters and the like in my nail art design, but I'm trying to get around that because I have some amazing Holo's that I don't often get to use, not to mention the thousands more I want to get my hands on. So, I decided to go all out with this one, holo everything! Well, almost. I also used a shimmer. Not that you can really see in these photos, but that's okay, I know it's there. Keep reading for a list of nail polish and tools I used to create this nail art design. 

Sweet Sweet Watermelon Nail Art

I used these polishes:
Paradise Punch by Lilypad Lacquer
Lime Zinger by Lilypad Lacquer
Mint Mojito by Lilypad Lacquer
Be Happy & Smile by Essence
Suzi Skis In The Pyrenees by OPI
Ready To Take Off by UNT
Kwik Dry Top Coat by Sally Hansen

The tools I used are:
French Tip Guides
Short striping brush


Sweet Sweet Watermelon with Paradise Punch


To create this nail art design, I started with with Ready to Take Off, then applied two coats of Be Happy & Smile as my base colour. Once dry, I applied Kwik Dry Top Coat. Giving this ample time to dry, I got Paradise Punch & Mint Mojito ready to go. I placed the french tip guide slightly above the middle of the nail, making sure to press them down tightly to avoid bleeding. Once in place, I applied Mint Mojito closest to the cuticle & Paradise Punch on the opposite side. Once I was satisfied with the opacity and prior to drying, I removed the guide. As you can see, with the first nail it was quite easy to remove, but as I went along it got harder and harder to remove each of the guides. This is because of the peel off base coat I used. I should have applied the guides to the nail as I did each one, rather than putting them all on at once. Lesson learned!
Moving on, I then took my short striping brush with Lime Zinger and created small lines over Mint Mojito. After cleaning the brush, I used Suzi Skis In The Pyrenees to create the seeds. I then finished off with a Kwik Dry Top Coat.


Sweet Sweet Watermelon with Mint Mojito

This is a design I've wanted to try doing for ages! I have no idea why it has taken this long, but I'm pretty happy with how it turned out, despite the lifting. I hoped the top coat would help weigh it down, but it clearly didn't. I have learned my lesson, though. This is not the first time this has happened, however I hope it's the last. I guess you could call this a bit of a nail fail.

On a side note, I always find it funny that most watermelon designs have seeds, considering most people hate seeds in the fruit, but I suppose it does add to the whole design. I think if I were to do this again, I'd probably use a dotting tool instead of the brush for seeds, as most of these look pretty terrible. 

What do you think?
Have you done this popular design?

Thanks for stopping by! 

Sunday, 10 December 2017

Ohh Shiny! Sequins & Metallic Nail Art


Hello lovely people.

I know we are currently within the holiday seasons, but as I detest all things Christmas, I won't be doing any kind of festive nail art this year (Here is one from last Christmas). Instead, I am opting for my usual style, what ever the heck I feel like, gosh! (little Napoleon Dynamite reference there). I will be focusing mainly on summer themes. This one how ever, is something I've wanted to do for a while. I have purchased a multitude of these nail sequins and they're just sitting in my nail art box, waiting for the day I'm brave enough to try them out. That time has finally come!  

Ohh Shiny! Nail Art

I used these polishes:

Ready To Take Off by UNT Cosmetics (peel off base coat)
A Mermaid's Tale by Face Of Australia, from the Calypso Bay collection
Kwik Dry Top Coat by Sally Hansen

The only products I used were the sequins which happen to have the longest product name ever! They're from Born Pretty store and the 'colour code' is 11.

Ohh Shiny! Nail Art with A Mermaids Tale

For this nail art, I applied a thin coat of Ready To Take Off. I did this so it'd be a hell of a lot easier to remove the sequins. I'm really not sure how these would go with acetone, but I can imagine it would not be fun. Once that was completely dry, I applied two coats of A Mermaids Tale. I then removed a small amount of the sequins from the jar and spread them out on my desk - this makes it a little easier to pick them up. I have a bottle of Kwik Dry Top Coat that's gotten a little gluggy with age, so I used this as a glue. I placed a small dot of polish onto my ring finger, placed a sequin on the polish and pressed it onto the nail using my finger. I continued this using various sizes to fill the nail as much as possible. I then placed a small dot of polish on my index and middle finger, then placed a large sequin on each of them. I finished with my non-gluggy Kwik Dry Top Coat. 

Ohh Shiny! Nail Art with Born Pretty Sequins

This didn't turn out exactly as I had planned it in my head and I know exactly why. Some of these sequins are thicker than I had originally thought. Being that I was applying a flat, non-malleable item onto a rounded surface, there were bound to be some issues. If you look closely at some of the larger ones you'll see they are slightly raised when placed outside the center of my nail. I think if I were to do this again I'd use a lot more of the smaller ones and stick to the center of the nail for the larger ones. 

I do love these colours together, though. The metallic polish being so close to the greeny-blue sequins was pretty exciting. I haven't really used this polish much, due to the streaky nature of it. But for this, I think it totally works. 

What do you think?
Do you like sequins in nail art?
Let me know in the comments.

Thanks for stopping by!

Sunday, 19 November 2017

Summer Inspired Ocean Shore Nail Art


Hello everyone.

I hope you're all well.

I am stepping a little out of bounds with this weeks mani.
I'm not typically the kind of person to follow the rules, so I figured I should apply my regular life choices to my blog and create a summer inspired nail art design in the midst of spring. I have been wanting to try this design for quite a while and I had this amazing nude colour staring me in the face, so I decided to just do it. 

Ocean Shore Nail Art

For this I used these polishes:
Do You Take Lei Away by OPI
Sky's The Limit by BYS
Blanc by Essie
Kwik Dry Top Coat by Sally Hansen 
G'day Matte Top Coat by Picture Polish

I also used these products and tools:
Liquid latex by Lulaa
Plastic cup
Water
Spray bottle with water
Cotton bud
Make up sponge

Once Shore with G'day Matte Top Coat

I started with two coats of Sky's The Limit for a base. Once dry, I applied a layer of liquid latex around each nail and allowed to dry. Taking a make up sponge, I applied Sky's The Limit and a smaller amount of Do You Take Lei Away, and dabbed it onto the nail. I continued this until I was satisfied with the gradient and opacity. I allowed this to dry completely before moving onto the next step. I then grabbed my plastic cup and spray bottle and filled them with water. Next, I applied liquid latex to each of my nails. Using Blanc, I placed a few drops into the cup and allowed them to spread. Taking the spray bottle, I then sprayed a little over the polish, which causes the polish to separate in an interesting pattern. I'm not gonna lie, this took a fair few tries because I didn't like the way it was separating. I finally just gave in and dipped my finger into the polish. Using the cotton bud, I cleaned up any excess polish on the surface of the water, then continued this with all nails before removing the liquid latex. Once the polish was dry, I dabbed a cloth over the nails to remove any leftover water from my hands.
To finish off, I applied Kwik Dry Top Coat, followed  by G'day Matte Top Coat. I feel like matte top coat always works better over the top of a regular top coat. 

Ocean Shore with Do You Take Lei Away

I was rather pleased with the outcome of this nail art, although it was a little hard to judge the way the pattern was going to turn out when looking in the cup. I think that's why I was a little skeptical at first and had to try it several times. I feel if I was to do this again I'd just close my eyes and let the polish do it's thing.
Also, I don't have a large collection of nude colours. I think I'm currently sitting on three, one of which was a gift for being part of my best friend's bridal party. I think this was probably a bargain buy which is why I have it. If I ever see a bottle of OPI for less than $10 I will just grab it. I love their polish, but it is so expensive! Another reason it took so long to try this nail art. 

What are your thoughts?
Have you tried this design?
Let me know by leaving a comment.

Thanks for stopping by!


Sunday, 5 November 2017

Crackle Topped Nail Art.

Hello lovely people!

Well, today has been a bit strange for me. I didn't get out of bed until about midday, so my whole day has been thrown out of whack... which is why this post is a little later than usual, unfortunately.

This week I have an experimental nail art that didn't quite go to plan. Even though it's not what I had pictured in my mind, I am still willing to share because it's still a fun design, and where's the fun in not sharing failures?  

For quite a while I have been chasing some crackle top coat. I finally got my hands on a few bottles from a cheap shop, only to get them home and find that they were very old and no longer the quality they once were. One had been sitting in the shop for so long that when I opened the bottle, the brush came loose from the cap and was stuck inside the semi-solid mass of polish. As you can imagine, I was devastated! I tried a fair bit of polish thinner, but that only helped enough so that I could remove the brush. So, I was quite lucky with the one I used for this nail art.
I also happened to pick up a few other colours that I just had to put together. Keep reading to see the polishes that I used and how I achieved this design. 

Crackle Topped nail art with Crackle Finish Pastel Purple 

For this design I used these polishes:
Matte Mint Green by BYS Cosmetics
Matte Fairy Floss by BYS Cosmetics
Crackle Finish Pastel Purple by BYS Cosmetics
Kwik Dry Top Coat by Sally Hansen

No tools were used for this design. 

Crackle Topped Nail Art

I started with coats of Matte Fairy Floss for my base. As pastels by BYS are usually sheer, I thought it best to put the darker colour over the top. Once dry, I painted Matte Mint Green over half of each nail. I was quite tempted to just stop there because these colours together look absolutely amazing side by side, but I carried on. I then applied a very thick coat of crackle finish pastel purple and allowed a long time to dry (you can see the cracks start to form as it dries). As you can see, most of the cracks are in the center of the nail because that's where the polish is the thickest. Once I was satisfied and thought it was dry enough, I applied my Kwik Dry Top Coat. 

Crackle Topped Nail Art with Matte Mint Green

That's all for this one. I was hoping for the cracks to be larger and show more of the colour underneath, but this stuff is quite unpredictable. It also wasn't as opaque as I had hoped either, but I think that could have something to do with the age of the polish. All in all, I don't think it turned out too bad, but I think next time I'll stick to simple colours. 

Have you tried crackle polish?
What was your experience?


Let me know what you think by leaving a comment below. 

Thanks for stopping by!