Showing posts with label BYS. Show all posts

Sunday, 30 September 2018

Halloween Nail Art! Bats Emerging!


Hello everyone!

I hope you're all enjoying the long weekend - I sure have been!
It has been a while since we had a full weekend of sunshine and with the extra day, we've definitely taken advantage of it. 

Now, I know I'm a little early on this one. I was going to post this design next week but, due to my bad organization skills, you get it this week! Lucky you! Ha ha.
I 'accidentally' purchased several Halloween stamping plates a few months ago, so I have a lot of potential design ideas floating around in my head. But, let's start with something nice and easy; a simple gradient with some stamping. 

Halloween Bats Emerging Nail Art

I used these polishes for this mani:
Matte Purple by BYS Cosmetics
Mellow Yellow by Sally Hansen
Ready To Take Off by UNT Cosmetics
Kwik Dry Top Coat by Sally Hansen
Big Matte Top Coat by Sally Hansen
Black Stamping Polish by Emily de Molly

I also used these tools:
Liquid Latex by LuLaa
Stamping Plate BPL-031
Stamping Plate Celebration BPX-L007
Clear stamper
Scraper
Mani Saver
Cotton wool with acetone
Cosmetic Sponge

Halloween Bats Emerging Nail Art with Mellow Yellow

I started with Ready To Take Off for the base (this is just quicker than cotton pads and acetone, as I will be repainting my nails for an event next week). Once that was dry, I applied two coats of Mellow Yellow. For some reason, the second coat was taking quite long to dry, so I ended up applying Kwik Dry Top Coat over it to help the process along. While that was drying, I painted liquid latex around each nail.
After allowing that to dry, I applied Mellow Yellow and Matte Purple horizontally onto a cosmetic sponge and began dabbing it over each nail. I moved the sponge up and down to get even coverage whilst creating a slight gradient, reapplying polish to the sponge as necessary. Once I was satisfied, I removed the liquid latex and then applied another coat of Kwik Dry Top Coat before reapplying the liquid latex to protect my skin from the stamping polish.
Next, I gathered my stamping tools. I applied Black Stamping Polish over the design I wanted on plate BPX-L007, scraped over it, picked up the image and pressed it onto the nail. Cleaning the plate between uses with my mani saver and a cotton ball, I also removed the liquid latex after each stamp. I used this stamp on my index and pinkie nails. These steps were repeated for my middle and ring nails, with a different image on plate BPL-031. After allowing time to dry, I applied Kwik Dry Top Coat to seal it all in and finished off with Big Matte Top Coat. 


Halloween Bats Emerging Nail Art with Matte Purple

I'm pretty happy with this design. I didn't want to do another orange Halloween design like last year, so I decided to do purple and yellow because I feel that's still pretty Halloween-y. Plus, they're opposing colours of the colour wheel so you know they'll go well together!
I was aiming for a sort of creepy sunset look, with the bats coming out for the night. 


What do you think?
Do you do Halloween nails?
Leave me a comment below!

Don't forget to check out my social media pages.

Thanks for stopping by!

Sunday, 29 April 2018

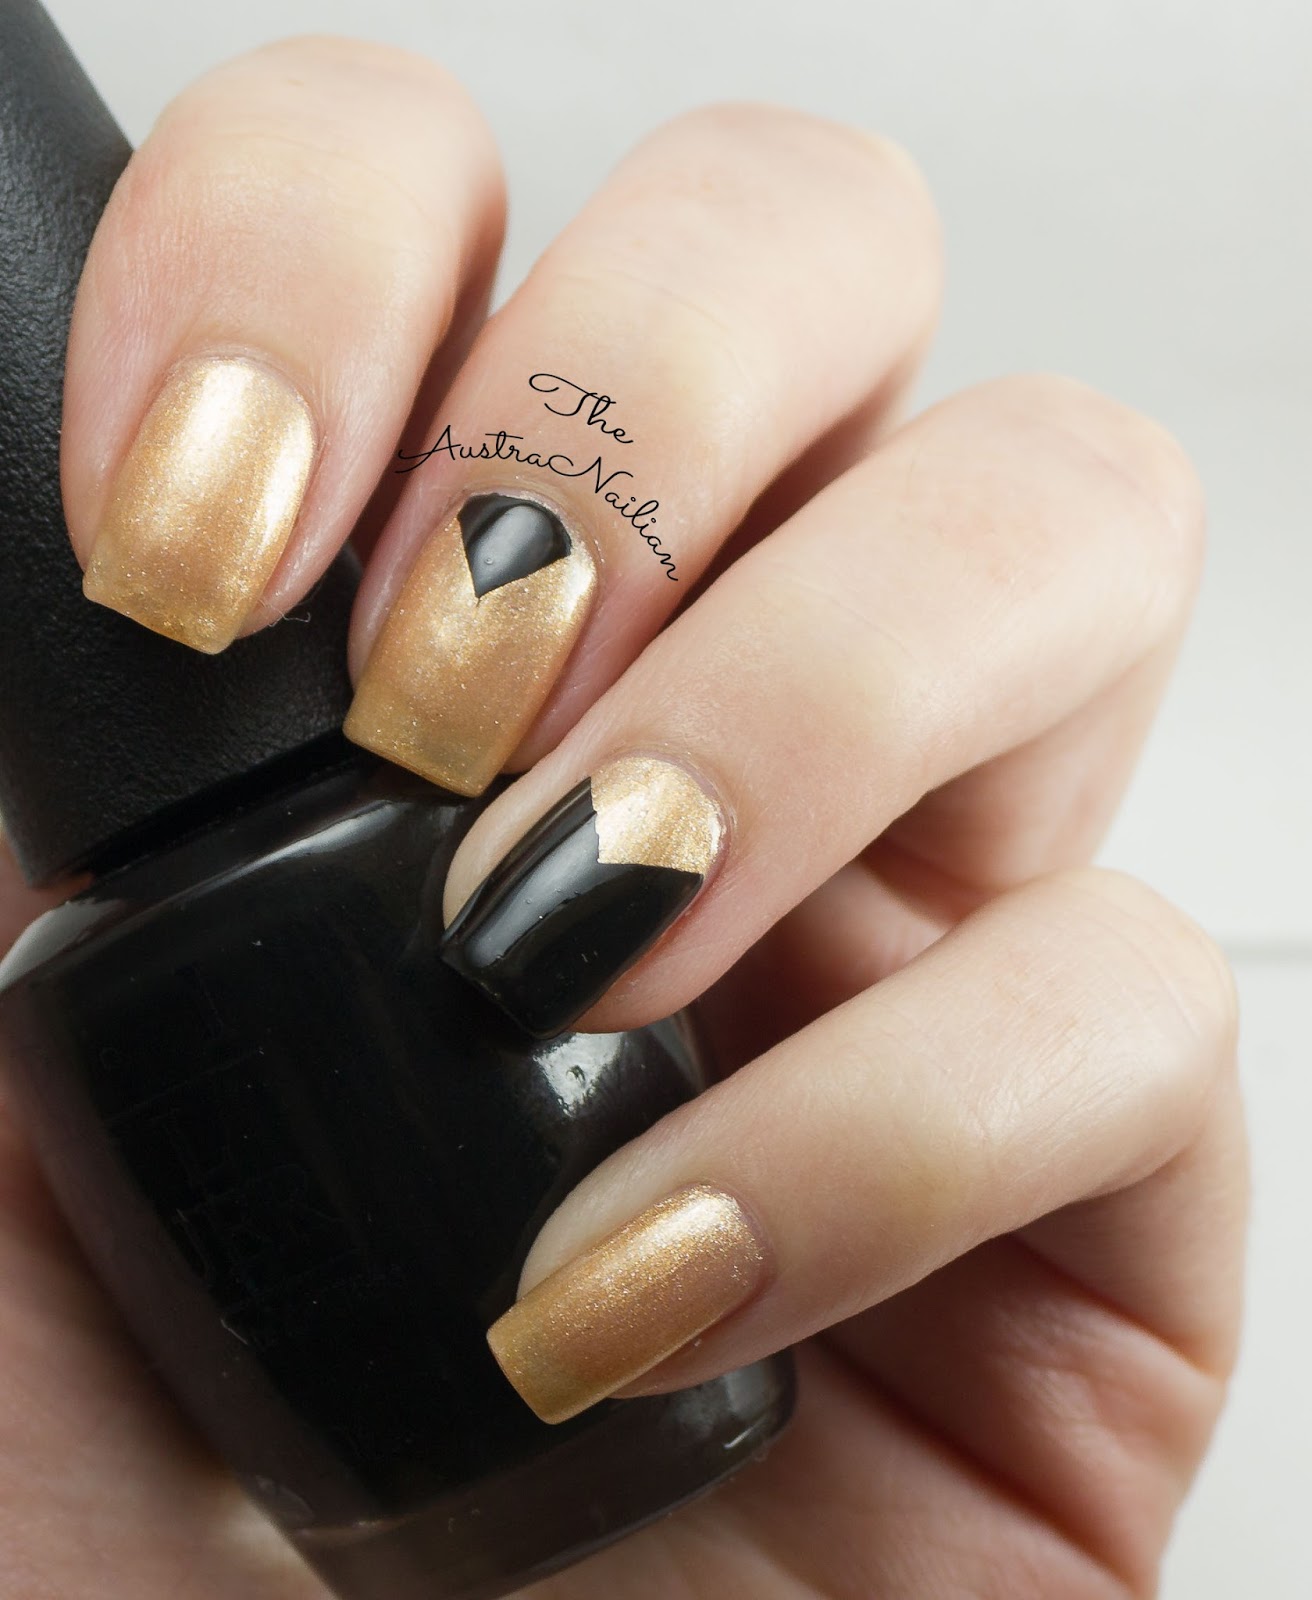
Black and Gold Nail Art

Hello everyone, 

I hope you've all enjoyed your weekend. It was pretty good on this side of the globe; bright, sunny, and just PERFECT for that classic jeans and t-shirt look... which just so happens to be my preferred attire - after PJs, of course!

I've got a nice and simple design this week. I have got a bit of thing with triangles on my nails, so this one was fun to create and wear. The best part is, you don't need any super-skilled talent to re-create this design! Don't let the simplicity and ease fool you, though - this design oozes elegance and is perfect for any occasion.


The following polishes were used for this design:
Golden Luster by BYS cosmetics
Lady In Black by OPI
Big Primer Base Coat by Sally Hansen
Kwik Dry Top Coat by Sally Hansen

As well as these products:
3mm Striping tape


To create this design I started with Big Primer Base Coat. 
Once dry, I applied three coats of Golden Luster, allowing more than enough time for each layer to dry completely. This shade is very sheer, as you can see (I probably should have added an additional coat in order to hide my smile line more thoroughly, however I didn't notice until I reviewed the photos). 
I then applied a coat of Kwik Dry Top Coat and let dry. 
Once it was completely dry, I cut four pieces of striping tape and applied two in the shape of a triangle on my middle and ring fingers, making sure to adhere it well to the nail. I then applied Lady In Black to the inner triangle on my middle finger, making sure it was opaque, then removed the tape. Moving onto my ring finger, I painted Lady In Black on the outer section of the nail, again ensuring complete coverage and removing the tape. Once dry, I applied another coat of Kwik Dry Top Coat to finish the design. 


Simple, yet beautiful.
A perfect example of how black and gold were just made for each other.
I really do love this gold polish, however I just wish it were more opaque...*sigh*... we can't have it all now, can we?

The beauty of this design really is in its simplicity.
It's so easy that ANYONE can do it - all you need are your favourite colours and some striping tape - which is cheap!
So cheap, in fact, that I have bucket-loads of it... I really should incorporate it more into my designs!  


So, let me know your thoughts.
Do you like the black and gold look?

What colours would you try for this design?

Thanks for stopping by!

Sunday, 14 January 2018

Unicorn Smoosh Marble Nail Art

Hello people!

Wow, how fast has this week gone? It's a little crazy. Sucks that it's already Sunday afternoon... where did my weekend go? At least today has been relatively cool, I've been in trackies all day, in the middle of summer! There's not much better than spending a day at home in my comfy clothes.

Anyway, moving onto the actual topic of this blog; this week's nail art. I've used my go-to style, a simple smoosh marble using pastels and Unicorn heads! (No unicorns were hurt during the making of this mani!) I'll list the polishes and products I used to create this design.

Unicorn Smoosh Marble

These are the polishes I used:

Tingle by piCture pOlish
Pretty As A Peach by BYS Cosmetics
Isn't She Lovely by BYS Cosmetics
Lucky Ducky by BYS Cosmetics
Drunk Tank Pink stamping polish by Hit The Bottle
Big Primer Base Coat by Sally Hansen
Kwik Dry Top Coat by Sally Hansen

These are the tools I used:
Large Clear Stamper
Scraper
Stamping Plate BP-164 by Born Pretty
Liquid Latex by Lulaa

Unicorn Smoosh Marble with Pretty As a Peach 

For this nail art I started with an even coat of Primer Base Coat, then applied two coats of Lucky Ducky. While drying, I applied liquid latex around each nail. I then organised my polishes by lining them up near my stamper and opening them, leaving the brush in the bottle. Once the latex and polish was dry, I applied a few drops of Lucky Ducky, Pretty As a Peach, Isn't She Lovely and Tingle onto the stamper, then pressed it into the nail, moving it around and dabbing it over the nail to get the desired coverage. I then removed the liquid latex and continued this for each nail. Taking stamping plate BP-164, I applied Drunk Tank Pink over the design, and scraped off the excess polish. I picked up the design with the stamper and pressed it onto the nail. I only did this for two nails, as I love showing off the smoosh and it really doesn't need much to accentuate it. I finished off with Kwik Dry Top Coat. 


Unicorn Smoosh Marble with Drunk Tank Pink
This one is fun to look at. It reminds me of the classic Rainbow Paddle Pop, the official treat of summer as a kid. I so miss those delicious Paddle Pops. Plus, unicorns! It was not intentionally the look I was going for, just the way it turned out, but I'm happy with it. I kinda regret adding the second unicorn, I should have glammed up the middle finger and made it an accent nail. There's always next time! 


What do you think?
Also, what's your favorite summer treat?
Leave me a comment!

Thanks for stopping by!

Sunday, 26 November 2017

Fake Holo Nail Art

Hello, hello!

Recently, one of my favorite cheap cosmetic brands brought out a new line of nail polish as part of their holographic cosmetics. Despite the name, from what I have seen, these products are actually iridescent and not at all holo. Of course this is disappointing, however, these polishes are so amazing that I forgive them for their lack of knowledge. I did jump on them and purchased three of the seven colours from this collection. I do intend to grab a couple more before they go, but they are a little more expensive than their regular polish.

So of course I had to do some sort of nail art with them. This is the first of most likely several nail art designs with these polishes. The art is pretty simple, but it looks so mesmerizing.
I'll list the polishes I used for this basic beauty below.

Fake Holo Nail Art

Nail Polish used:
Big Primer Base Coat by Sally Hansen
Lady In Black by OPI
Unicorn Magic by BYS
Kwik Dry Top Coat by Sally Hansen

Fake Holo Nail Art with Unicorn Magic

After applying Big Primer base coat, I used two coats of Lady In Black. Once dry, I painted two coats of Unicorn Magic on my ring finger. Using the polish brush and a moderately steady hand, I painted the lower half of my pinky and the tip of my index finger. I used two coats for these also, and finished with a Kwik Dry Top Coat. 

Fake Holo Nail Art

I know this was a quick one, but I just had to share this mani. Unicorn Magic in the bottle is a beautiful pastel purple iridescent colour with blue and pink shifting tones. Applying it to a black base really brings out the blue. I love the way it looks!

What are your thoughts?

Have you tried these 'holographic' colours? 

Thanks for stopping by!

Sunday, 5 November 2017

Crackle Topped Nail Art.

Hello lovely people!

Well, today has been a bit strange for me. I didn't get out of bed until about midday, so my whole day has been thrown out of whack... which is why this post is a little later than usual, unfortunately.

This week I have an experimental nail art that didn't quite go to plan. Even though it's not what I had pictured in my mind, I am still willing to share because it's still a fun design, and where's the fun in not sharing failures?  

For quite a while I have been chasing some crackle top coat. I finally got my hands on a few bottles from a cheap shop, only to get them home and find that they were very old and no longer the quality they once were. One had been sitting in the shop for so long that when I opened the bottle, the brush came loose from the cap and was stuck inside the semi-solid mass of polish. As you can imagine, I was devastated! I tried a fair bit of polish thinner, but that only helped enough so that I could remove the brush. So, I was quite lucky with the one I used for this nail art.
I also happened to pick up a few other colours that I just had to put together. Keep reading to see the polishes that I used and how I achieved this design. 

Crackle Topped nail art with Crackle Finish Pastel Purple 

For this design I used these polishes:
Matte Mint Green by BYS Cosmetics
Matte Fairy Floss by BYS Cosmetics
Crackle Finish Pastel Purple by BYS Cosmetics
Kwik Dry Top Coat by Sally Hansen

No tools were used for this design. 

Crackle Topped Nail Art

I started with coats of Matte Fairy Floss for my base. As pastels by BYS are usually sheer, I thought it best to put the darker colour over the top. Once dry, I painted Matte Mint Green over half of each nail. I was quite tempted to just stop there because these colours together look absolutely amazing side by side, but I carried on. I then applied a very thick coat of crackle finish pastel purple and allowed a long time to dry (you can see the cracks start to form as it dries). As you can see, most of the cracks are in the center of the nail because that's where the polish is the thickest. Once I was satisfied and thought it was dry enough, I applied my Kwik Dry Top Coat. 

Crackle Topped Nail Art with Matte Mint Green

That's all for this one. I was hoping for the cracks to be larger and show more of the colour underneath, but this stuff is quite unpredictable. It also wasn't as opaque as I had hoped either, but I think that could have something to do with the age of the polish. All in all, I don't think it turned out too bad, but I think next time I'll stick to simple colours. 

Have you tried crackle polish?
What was your experience?


Let me know what you think by leaving a comment below. 

Thanks for stopping by!

Sunday, 22 October 2017

Rainbow Dotticure Nail Art


Howdy everyone!

Well, it looks like it's Sunday again already! These last two weeks have just completely flown by! I can't believe it. I'm really excited because last week's mani lasted about two days, which is pretty devastating. I'm not exactly sure why, but that means it's definitely time for a new nail art design!

Here it is, a basic rainbow dotticure design that's so easy, anyone can do it - no skills required. I love being able to use multiple colours in my nail art and I love doing simple designs, so why not combine the two? Keep reading to see what products and polishes I used to create this design.

Rainbow Dotticure Nail Art Design

For this nail art I used the following polishes:
Status Symbol by Essie
Matte Purple by BYS Cosmetics
Head In The Clouds by BYS Cosmetics
Roller Coaster by BYS Cosmetics
Sand In Your Stilettos by Chi Chi Cosmetics
Blanc by Essie
Kwik Dry Top Coat by Sally Hansen
G'day Matte Top Coat by piCture pOlish

Products used:
Medium sized dotting tool
Plastic sandwich bag

Rainbow Dotticure Nail Art Design with Head In The Clouds
I started with two coats of Blanc for my base, allowing sufficient time for each layer to dry. I then took a plastic sandwich bag and dropped a small amount of Pink onto it. Using my dotting tool, I dipped it into Pink and started placing random dots on my index nail. Each time I use it, the size changes due to the amount of polish left. I tried to make larger dots by circling around a dot I'd already created, but things got a little out of hand and they now look like blobs. I only have the one size tool so this is all I could do... I really ought to get a few different sized ones. Once I was satisfied with the coverage of dots, I cleaned my dotting tool by dipping it into some acetone and wiping it on a sheet of paper towel. I then moved onto the next colour. I continued this for all nails, making sure to clean my tool in between each colour. Once I was finished with the dots, I applied Kwik Dry Top Coat, allowed time to dry and then finished with G'day Matte Top Coat.  

Rainbow Dotticure with Status Symbol
So there you have it. A really easy, cute and fun nail art design that anyone can do! You don't even need an actual dotting tool. Years back, before I knew there were such things as tools for nail art, I used a toothpick that I would hit against a hard surface until it became blunt and slightly larger. It works just as well as the tool I now have, and much easier to clean because you can just chuck it in the bin! I was actually pretty impressed with the outcome of this design because I have a bad habit of needing things to be neat and orderly, so trying to place dots in random locations was hard... but I made it through! 

Rainbow Dotticure with G'day Matte Top Coat
That's all for this week. 
What do you think? 
Have you done something like this? 
Let me know by leaving a comment below, or a link to your design, I'd love to check it out myself. 

Thanks for stopping by!

Sunday, 10 September 2017

Neon Stone Marble Nail Art


Hey everyone. 
It's starting to look a lot like spring around here. We've had two sunny days in a row! Which seems to be some sort of magic at the moment. So, to celebrate this, here's my first attempt at a stone marble design using neon colours. 

Neon Stone Marble Nail Art Design
For this design, I used these items:
Hidden Treasure - BYS
Citrus - ulta3
Atomic Oj - ulta3
Fruit Tingle - ulta3
Tahiti - ulta3
Large Stamper
Camo Coat - Celestial

Neon Stone Marble with Hidden Treasure - BYS 

I started with Hidden Treasure for the base coat, three coats to get a decent opacity. After allowing them to dry, I grabbed a plastic sandwich bag. Taking each polish, Citrus, Tahiti, Atomic Oj and Fruit Tingle, I dropped each colour on top of the next to create a bulls eye. I made two of these close to each other. Then I picked up the bag and started rotating to swirl the polish around and create a stone-like pattern. Once I was happy and before the polish dried, I used a stamper to pick up the pattern and transfer it to my ring finger. Then I finished off with a quick dry top coat.
 
Neon Stone Marble Nail Art with Citrus - ulta3

That's all for this one. This one was really fun. I tried this out so many times beforehand to figure out the best way to get the look I wanted. I was going to turn this into a decal and put it on after drying but they take a long time to dry and I'm a little impatient. Haha. Eventually I would like to try doing it that way because using a stamper de-saturated it, which kind of sucked, but I wasn't too mad about it.

Neon Stone Marble Nail Art Close Up

I'm pretty happy with the end result, especially since I wasn't sure it would work.
What are your thoughts?
Have you tried this?
If so, I'd love to see it!
Leave me a comment below and I'll check it out. 


Thanks for stopping by!

Sunday, 13 August 2017

Skulls and Roses Stamping Nail Art


Hello everyone!
It's a beautiful sunny Sunday right now. We are slowly starting to get that awesome spring weather, which is just lovely!
I have a very simple design this week, using one of my favorites... Stamping! 

Skull and Roses with Black Stamping Polish - Emily de Molly

For this design I used these:
Rebel Red - BYS
Black Stamping Polish - Emily de Molly 
Plate 28 - 春の歌 
Large stamper
Camo Coat - Celestial

Skull and Roses with Rebel Red - BYS

To create this design I started with two coats of Rebel Red, then applied a Camo Coat around each nail. After allowing them to dry, I took stamping plate 28, painted Black Stamping polish over the design and stamped it onto each nail. Once I had finished stamping I removed the Camo Coat and applied a quick dry top coat.


Skulls and Roses Nail Art Design

I didn't notice until I moved onto the second nail that the first design was upside-down. I decided to do another the same and do the remaining two the right way up. Since I use regular polish, trying to fix this would have just been a pain. Sometimes, you just gotta go with it. I don't mind though, I think it's a little more interesting this way. What do you think?

Thanks for stopping by!

Sunday, 23 July 2017

Boyfriend's Pick - Black and Green Gradient

Hey people!
Hope y'all are doing well.

This design comes partly from my boyfriend. I asked him to pick out at least two colours from my collection for me to create a design with. He chose black and green, and this is what I did.

Black and Green Gradient with Fatal Attraction - BYS

To create this look I used the following colours and tools:
Lady in Black - OPI
Fatal Attraction - BYS
Camo Coat - Celestial
Cosmetic sponge 
Thin Striping Tape
G'day Matte Top Coat - Picture Polish.
  
Black & Green Gradient with G'day Matte Top Coat - piCture pOlish

I started with two coats of Fatal Attraction as a base. I painted Camo Coat over each nail and allowed to dry. I then took a cosmetic sponge and painted on Fatal Attraction and Lady in Black, then dabbed onto the index and middle nails. When I got to the next one, I placed four pieces of striping tape vertically on the nail and dabbed over the top. Once satisfied with the gradient, I quickly removed the tape. I decided to leave the pinky as just Fatal Attraction and painted my thumb with Lady in Black. I finished off with G'day Matte Top Coat. 


Green & Black Gradient Nail Art
I do wish that I had done another coat or two of Fatal Attraction as this colour is rather translucent. I also learnt that I need to stick the tape over the free edge of my nail when doing gradients like this. As you can see, it bled through on the tip and I don't like the way it looks.

This was fun though, not something I would have normally done, so I am always grateful for the input of my partner.

What do you think? Does your partner help you out with designs? Let me know below.

Thanks for stopping by!

Sunday, 9 July 2017

Purple Smoosh Nail Art Design


Hey lovely people!
I hope everyone is doing well. 


I did this one a while ago and have been saving it for a rainy day, which it actually is today, or it was...But as you may have noticed, I have been a bit MIA recently so this has come in handy! Haha, pun not intended. 

Purple Smoosh Nail Art
This one was super easy, I used the following items:
Orchid - piCture pOlish
Blanc - Essie
Party Popper - BYS
Violet Frosting - BYS
Matte Purple - BYS
Camo Coat - Celestial 
Nail Stamper

Purple Smoosh Nail Art with Orchid - piCture pOlish

To create this look, I applied two coats of Blanc for the base. Once dry I put Camo Coat around all nails. I took Matte Purple, Violet Frosting & Orchid and dropped small amounts onto the stamper and pressed it onto the nail, then removed the Camo Coat. Once dry I applied a thin coat of Party Popper and finished with a quick dry top coat.

Purple Smoosh Nail Art with Party Popper
So that's all for today folks. What do you think? Smoosh nails are so fabulous & seriously easy! If I could only do one style for the rest of my life, this would be it. 

Thanks for stopping by!

Sunday, 7 May 2017

Spring Inspired Gradient & Stamping

Hello lovelies!
We have had some beautiful spring weather the last few days, so I thought this mani would be fairly fitting.


I really love the way they turned out. I think I could wear this design all year long! At the moment I am trying to break out of my comfort zone a little and try new techniques. This one isn't too far from what I usually do, but I'd never tried a vertical gradient before. I tell you what, I really like it. I think it brings a whole new depth to nail art!


For this one I used:
BYS - Isn't She Lovely
BYS - Matte Violet Frosting
BYS - Matte Mint Candy
BYS - Sky's The Limit
Essie - Blanc
Born Pretty - White Stamping Polish
piCture pOlish - D'day Matte Top Coat
Born Pretty Stamping Plate - BP - X05
Celestial - camo coat.


I started with two coats of Blanc for a base. Once dry I applied Camo Coat around the cuticles. While that was drying I applied three coats of Isn't She Lovely to my pinky nail, and Matte Mint Candy to my thumb. I took Isn't She Lovely and Matte Violet Frosting and painted them onto a makeup sponge, applied a thin layer of Blanc over the Matte Violet Frosting to de-saturate it a little, then dabbed it onto my ring finger, making sure Isn't She Lovely was on the left side. I continued to do this until I reached the right opacity, which was quite a bit due to the pale colour of Isn't She Lovely. I let each layer dry for a few seconds before continuing. Once that was complete, I removed the Camo Coat on that finger. I did the same steps for my middle finger, but used Matte Violet Frosting and Sky's The Limit instead. Same again for my ring finger, except with Sky's The Limit and Matte Mint Candy. Once they had all dried I grabbed my BP - X05 stamping plate and White Stamping Polish, and stamped the same design onto each nail. I finished with G'day Matte Top Coat to soften it even more. 


I really enjoyed this design, but it was a little time consuming. Probably the most so far. But I am okay with that because every time I looked at them, they made me smile. What do you think?
Thanks for stopping by!