Showing posts with label holographic. Show all posts

Sunday, 24 June 2018

Yoga Pants Inspired Nail Art

Hello beautiful people!

I'm sorry I didn't get time to do a post last week - I had a very busy day and by the time I got home I was too tired to even look at my nails. However, I have had a lot more free time lately, which means I have added to my collection of nail art and now have back ups for days just like that. 

This week's nail art (in case you didn't read the title) was inspired by my fantastic new yoga pants, which I managed to get for free (using a loyalty program!)
These are the yoga pants for comparison.
The design on these pants is just so cool, that when I bought them, I knew I had to recreate it in nail art form. I was hoping to use holographic polish for this nail art and, luckily, I was able to find ones that matched pretty closely. 

Yoga Pants Inspired Nail Art

I used these polishes:
Sample by Celestial Cosmetics (I received this as a gift with purchase)
Big Hair Don't Care by Celestial Cosmetics
Mind That Mullet by Celestial Cosmetics
Mermaids Tale by BYS Cosmetics
Ready To Take Off by UNT
Kwik Dry Top Coat by Sally Hansen

I used these tools:
Sandwich bag
Fan nail art brush
Short nail art brush

Yoga Pants Inspired Nail Art with Mind That Mullet

I started with one coat of Ready To Take Off. After drying, I applied two coats of Sample. Once dry, I grabbed my brushes and a sandwich bag, then applied a few drops of Big Hair Don't Care to the bag. Using the fan brush, I picked up some polish and lightly brushed it across part of the nail. I did this for all five nails, making several passes, as Sample was quite dark and detracted from the lighter colour.
Moving onto Mind That Mullet, I applied some polish to the bag. Taking the short brush, I scooped up Mind That Mullet and painted the nail where Big Hair Don't Care hadn't been previously applied, whilst still leaving space for the third and final colour. Again, I had to make several passes on each nail.
Lastly, I repeated these steps for Mermaids Tale. This one didn't require quite as many coats, due to the iridescent nature of this polish. I then went back in with Sample to create some space in each colour, giving it more of a textured look.
To finish, I applied a coat of Kwik Dry Top Coat. 


Yoga Pants Inspired Nail Art with Sample

I had a great time creating this design. It took a whole lot more work than I was anticipating, but it was interesting to see the way the colours reacted to each other. Mermaids Tale comes out pretty majestically over the dark colours. This is part of the fake Holo collection from BYS Cosmetics (they labeled it as Holographic, but we all know it's not). You can see more of that here.

It was pretty cool to have my nails match my clothing for a change. I always wanted to be someone who changed their nail polish every day just for the effect, but I struggle to find time to do them even once a week, let alone once a day!

Next time, I would probably use Big Hair Don't Care as the base colour. It would have been so much easier, but I wanted to stick with the inspiration as much as I could. I definitely learnt something from this one.  

What do you think of the mash of holos?

Have you recreated the design of your yoga pants?

Leave me a comment, photo or link.

Thanks for stopping by!

Sunday, 15 April 2018

Holographic Aztec Inspired Nail Art

Hello everyone!

I hope you're enjoying the weekend. It has been raining on and off for the last few days here, which is amazing and much needed! I love rainy days; staying inside with cozy clothes and all the internet I can poke a stick at. I spent most of yesterday looking at various nail art to get some new ideas. It didn't turn out as successful as I had hoped, but it's always good to see what everyone else is doing with their amazing nail skills.

Today, I am bringing you this fun, holo-filled, Aztec-inspired nail art. I have these fabulous holographic polishes from Celestial Cosmetics that are dying to see the light of day again! I am always so scared to use holo in nail art, but I think this one has helped break me out of this a bit. Hopefully you'll get to see more of it. 

Holographic Aztec-inspired Nail Art

For this design I used these polishes:
Blanc by Essie
Classy, Sassy & A Little Badassy by Celestial Cosmetics
Hell In High Heels by Celestial Cosmetics
Broken Glass by Celestial Cosmetics
Crystal Ship by Celestial Cosmetics
Black Stamping Polish by Emily de Molly
Big Primer Base Coat by Sally Hansen
Kwik Dry Top Coat by Sally Hansen

I also used these items:
BP-L048 Stamping Plate by Born Pretty
Large clear stamper
Scarper
Liquid Latex by Lulaa

Holographic Aztec-inspired Nail Art with Hell In High Heels

I started this design with Big Primer base coat. After drying, I applied two coats of Blanc. I then applied liquid latex around each nail. Taking Broken Glass, I wiped the excess polish off the brush using the neck of the bottle, then gently brushed it on to each nail. I continued with Crystal, Hell In High Heels, and Classy, Sassy & A Little Badassy. I did go back in with the polishes that I felt needed a stronger presence. I then took BP-L048 stamping plate, painted Black stamping polish over the design I wanted, scraped off the excess and used my stamper to transfer each design to the nail. I used three different designs, all from the same plate. After allowing the polish ample time to dry, I applied Kwik Dry Top Coat to finish. 

Holographic Aztec-inspired Nail Art with Broken Glass

So that's all for this one!
I love dry brush nail art - with the addition of holo and stamping over top, it's such a fun design! I love the colour combination of this design, the variation of strong bright colours with the soft ones create a nice juxtaposition. 


I decided to use different designs from the same plate. I don't do this too often, and I'm seeing why - I'm not all that pleased with how it turned out.
If I were to do it again, I'd use the diamond on my pinky, and possibly only on two nails, to really let that dry brush holo shine. Either way, it's still a cool design (in my totally biased opinion).


What are your thoughts?

Thanks for stopping by!

Sunday, 7 January 2018

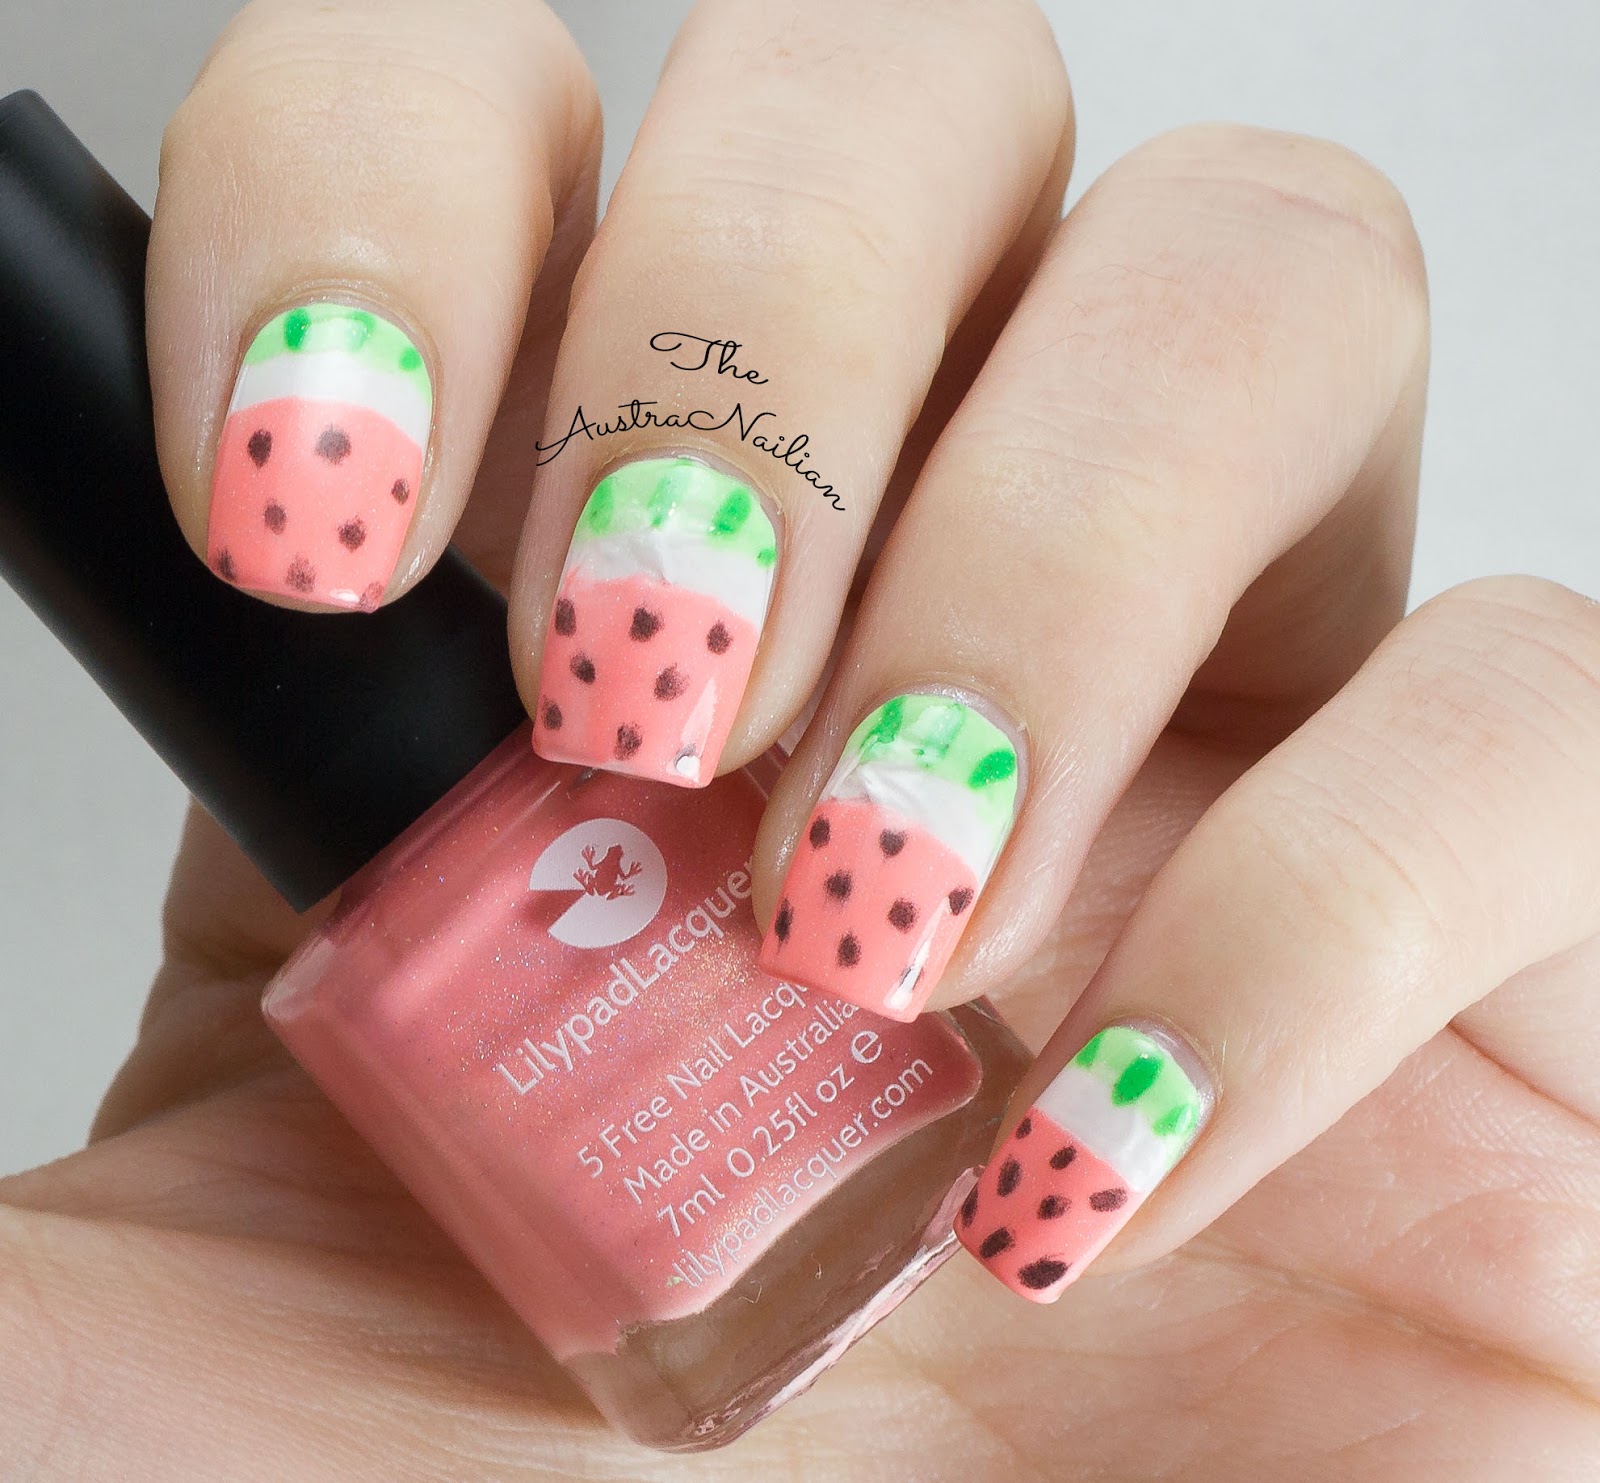
Sweet Sweet Watermelon Nail Art


Hello everyone,

I hope you all enjoyed the holiday season, whether celebrated or otherwise. I have been enjoying some time out with friends and family as well as exploring the beauty of North East Victoria. And of course, stocking up on some new polishes. I think I picked up about 20 new ones over the last two weeks, woops! 

I thought I'd start 2018 off with a super sweet summer-perfect nail art. A fun Holo watermelon design! I am not really to keen on using holos/glitters and the like in my nail art design, but I'm trying to get around that because I have some amazing Holo's that I don't often get to use, not to mention the thousands more I want to get my hands on. So, I decided to go all out with this one, holo everything! Well, almost. I also used a shimmer. Not that you can really see in these photos, but that's okay, I know it's there. Keep reading for a list of nail polish and tools I used to create this nail art design. 

Sweet Sweet Watermelon Nail Art

I used these polishes:
Paradise Punch by Lilypad Lacquer
Lime Zinger by Lilypad Lacquer
Mint Mojito by Lilypad Lacquer
Be Happy & Smile by Essence
Suzi Skis In The Pyrenees by OPI
Ready To Take Off by UNT
Kwik Dry Top Coat by Sally Hansen

The tools I used are:
French Tip Guides
Short striping brush


Sweet Sweet Watermelon with Paradise Punch


To create this nail art design, I started with with Ready to Take Off, then applied two coats of Be Happy & Smile as my base colour. Once dry, I applied Kwik Dry Top Coat. Giving this ample time to dry, I got Paradise Punch & Mint Mojito ready to go. I placed the french tip guide slightly above the middle of the nail, making sure to press them down tightly to avoid bleeding. Once in place, I applied Mint Mojito closest to the cuticle & Paradise Punch on the opposite side. Once I was satisfied with the opacity and prior to drying, I removed the guide. As you can see, with the first nail it was quite easy to remove, but as I went along it got harder and harder to remove each of the guides. This is because of the peel off base coat I used. I should have applied the guides to the nail as I did each one, rather than putting them all on at once. Lesson learned!
Moving on, I then took my short striping brush with Lime Zinger and created small lines over Mint Mojito. After cleaning the brush, I used Suzi Skis In The Pyrenees to create the seeds. I then finished off with a Kwik Dry Top Coat.


Sweet Sweet Watermelon with Mint Mojito

This is a design I've wanted to try doing for ages! I have no idea why it has taken this long, but I'm pretty happy with how it turned out, despite the lifting. I hoped the top coat would help weigh it down, but it clearly didn't. I have learned my lesson, though. This is not the first time this has happened, however I hope it's the last. I guess you could call this a bit of a nail fail.

On a side note, I always find it funny that most watermelon designs have seeds, considering most people hate seeds in the fruit, but I suppose it does add to the whole design. I think if I were to do this again, I'd probably use a dotting tool instead of the brush for seeds, as most of these look pretty terrible. 

What do you think?
Have you done this popular design?

Thanks for stopping by!